工欲善其事,必先利其器。即便介绍了再多生成模型,没有趁手的工具也难以施展才华。因此,本文将重点介绍几个在生成模型开发中常用的 Python 库,着重讲解 Diffusers 和 Accelerate 的基本使用。感谢 Hugging Face 为无数算法工程师提供了强大的开源支持!需要注意的是,官方文档对这两个库已有详尽的说明,本文仅作为一篇简明的使用笔记,抛砖引玉,供参考和交流。
accelerate
推荐直接阅读官方文档:https://huggingface.co/docs/accelerate/index
pip install accelerate
介绍之前了解一下这个库是干什么的:这个库主要提供一个快速的分布式训练(避免了直接用torch进行手搓)并且支持各类加速方法:混合精度训练、Deepspeed、梯度累计等
一个基本使用场景
一般任务中一个常见的应用场景是:需要实现一个多显卡(这里假设为双显卡)分布式训练,并且使用梯度累计、混合精度训练,并且训练得到的结果通过tensorboard/wandb进行记录,除此之外还需要使用warm-up学习率调整策略,并且我的模型不同模块使用的学习率不同,训练完成之后所有的模型权重要进行保存/读取权重进行测试。那么可以直接通过下面代码进行实现(部分库的导入以及一些参数比如说config直接忽略)
from accelerate import Accelerator
kwargs_handlers=[DistributedDataParallelKwargs(find_unused_parameters=True)] # 不是必须的
# Step-1 首先初始化 accelerate
accelerator = Accelerator(mixed_precision= 'fp16',
                            gradient_accumulation_steps= 2,
                            log_with= ['tensorboard', 'wandb'], # 一般来说用一个即可
                            project_dir=os.path.join(config.output_dir, "logs"),
                            kwargs_handlers= kwargs_handlers
                            )
# 仅在主线程上创建文件夹
if accelerator.is_main_process:
    os.makedirs(config.output_dir, exist_ok=True)
    # 初始化一个实验记录器(此处内容需要注意⭐)
    # accelerator.init_trackers(f"Train-{config.training}")
    log_name = 'Model-Test'
    accelerator.init_trackers(
        project_name= f"Page-Layout-Analysis-{config.pred_heads}",
        init_kwargs={
            "wandb": {
                "name": log_name,
                "dir": os.path.join(config.output_dir, "logs"),
                "config": vars(config)
            }
        }
        )

# Step-2 初始化完成之后可以直接将我们需要的内容通过 accelerator.prepare 进行处理
optimizer = torch.optim.AdamW([
        {'params': model.image_model.parameters(), 'lr': 2e-5, 'weight_decay': 1e-4},
        {'params': model.text_model.parameters(), 'lr': 4e-5},
        {'params': [p for n, p in model.named_parameters()
                    if 'image_model' not in n and 'text_model' not in n],
        'lr': config.learning_rate, 'weight_decay': 1e-4},
    ])
total_steps = config.epochs * len(train_dataloader)
warmup_steps = int(0.15 * total_steps)

# Warmup 调度器:从 0.1*lr 线性增加到 lr
warmup_scheduler = torch.optim.lr_scheduler.LinearLR(optimizer,
                                                        start_factor=0.1,
                                                        total_iters=warmup_steps
)

# 余弦退火调度器:添加 eta_min 防止学习率过低
cosine_scheduler = torch.optim.lr_scheduler.CosineAnnealingLR(optimizer,
                                                                T_max=total_steps - warmup_steps,
                                                                eta_min=1e-6
)

cosine_scheduler = torch.optim.lr_scheduler.CosineAnnealingLR(optimizer,
                                                                T_max=total_steps - warmup_steps)
lr_scheduler = torch.optim.lr_scheduler.SequentialLR(
    optimizer,
    schedulers=[warmup_scheduler, cosine_scheduler],
    milestones=[warmup_steps]
)
dataloader, model, optimizer, scheduler = accelerator.prepare(dataloader, model, optimizer, scheduler)

# Step-3 模型训练以及模型优化
total_data = len(dataloader)
for i, batch in enumerate(dataloader):
    with accelerator.accumulate(model): # 梯度累计
        inputs, targets = batch

        # 下面两句可以不用,但是习惯还是直接使用
        inputs = inputs.to(accelerator.device)
        targets = targets.to(accelerator.device)

        outputs = model(inputs)
        loss = loss_function(outputs, targets)
        accelerator.backward(loss)
        if accelerator.sync_gradients: # 进行梯度裁剪
            accelerator.clip_grad_norm_(model.parameters(), 1.0)
        optimizer.step()
        scheduler.step()
        optimizer.zero_grad()

        # 记录一下实验结果
        logs = {
                "Train/loss": loss.item(),
                "Train/lr": optimizer.param_groups[0]['lr'], # 这里是假设模型使用的优化学习率不同 或者直接使用 scheduler.get_last_lr()[0]
                "Train/ACC": acc,
            }
            progress_bar.set_postfix(
                loss=loss.item(),
                acc=acc, f1=f1)
            accelerator.log(logs, step= epoch* total_data+ i)

# Step-3 同步不同进程
accelerator.wait_for_everyone()
if accelerator.is_main_process:
    model = accelerator.unwrap_model(model)
    model.save_pretrained(os.path.join(args.output_dir, "model"))
accelerator.end_training()
不过对于上面的代码需要注意如下几个内容
1、追踪器使用:一般多显卡使用过程中通过使用 accelerator.end_training() 去结束 tracker
2、tqdm使用:一般只需要主进程进行显示进度条,因此一般直接:tqdm(..., disable=not accelerator.is_local_main_process)
diffuser
推荐直接阅读官方文档:https://huggingface.co/docs/diffusers/main/en/index
pip install git+https://github.com/huggingface/diffusers
基本使用
对于Diffusion Model原理理解可以参考,以及直接通过下面训练一个Diffusion Model代码(代码不一定很规范)进行解释。
from diffusers import DDPMScheduler

noise_scheduler = DDPMScheduler(num_train_timesteps= config.num_train_timesteps,
                            beta_start= config.beta_start, # 两个beta代表加噪权重
                            beta_end= config.beta_end,
                            beta_schedule= 'scaled_linear')
...
# training
for epoch in range(config.epochs):
    for i, batch in enumerate(train_dataloader):
        image = batch["images"]
        ...
        timesteps = torch.randint(0, noise_scheduler.config.num_train_timesteps,
                                    (image.shape[0],),
                                    device=image.device,
                                    dtype=torch.int64)

        noise = torch.randn(image.shape, device= accelerator.device)
        noise_image = noise_scheduler.add_noise(image, noise, timesteps)
        ...
        noise_pred = model(noise_image, timesteps)
        loss = F.mse_loss(noise_pred, noise)
        ...
# eva
def evaluate(..., noise_scheduler, ):
    ...
    noise = torch.randn((config.eval_batch_size, config.channel, config.image_size, config.image_size)) # 可以选择固定随机数种子
    for t in noise_scheduler.timesteps:
        t_tensor = torch.full((noise.shape[0],),
                                t,
                                dtype=torch.long,
                                device= device)
        predicted_noise = model(noise, t_tensor, text_label)
        noise = noise_scheduler.step(predicted_noise, t, noise).prev_sample
    images = (noise.clamp(-1, 1) + 1) / 2
    ...
训练过程
1、加噪处理:通过选择使用DDPM/DDIM而后将生成的”确定的噪声”添加到图片上 noise_scheduler.add_noise(image, noise, timesteps)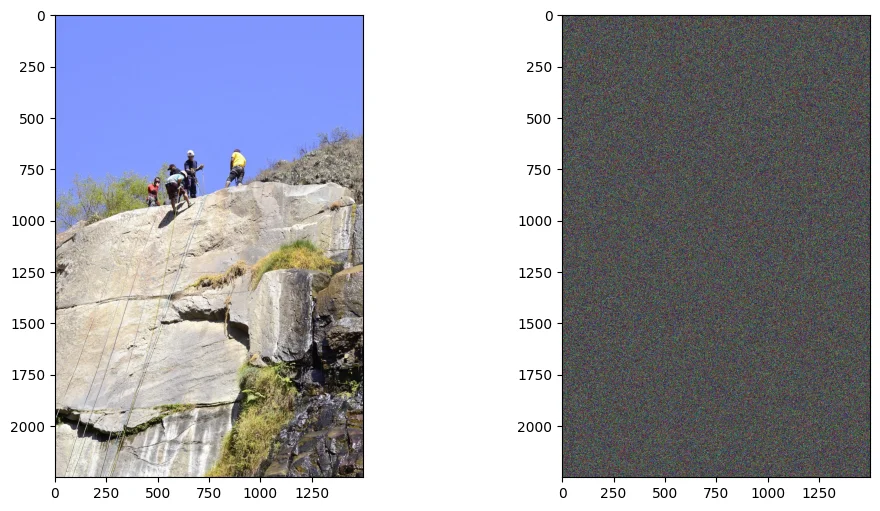
2、模型预测:通过模型去预测所添加的噪声并且计算loss
生成过程
3、逐步解噪:训练好的模型逐步预测噪声之后将其从噪声图片中将噪声剥离出来
1、Scheduler
https://huggingface.co/docs/diffusers/api/schedulers/overview
更加详细的描述:https://www.big-yellow-j.top/posts/2025/07/06/DFscheduler.html
以DDPMScheduler为例主要使用两个功能:
1、add_noise(输入:sample、noise、timesteps):这个比较简单就是直接:$x=\sqrt{\alpha}x+ \sqrt{1-\alpha}\epsilon$
2、step(输入:model_output、timestep、sample):step做的就是将上面的add_noise进行逆操作。具体代码处理
- Step-1 首先计算几个参数:$\alpha、\beta$
alpha_prod_t = self.alphas_cumprod[t]
alpha_prod_t_prev = self.alphas_cumprod[prev_t] if prev_t >= 0 else self.one
beta_prod_t = 1 - alpha_prod_t
beta_prod_t_prev = 1 - alpha_prod_t_prev
current_alpha_t = alpha_prod_t / alpha_prod_t_prev
current_beta_t = 1 - current_alpha_t
- Step-2 根据计算得到参数反推$t-1$的计算结果(提供3种类,介绍“epsilon”)$x_0=\frac{x_T- \sqrt{1- \alpha_t}\epsilon}{\alpha_t}$
pred_original_sample = (sample - beta_prod_t ** (0.5) * model_output) / alpha_prod_t ** (0.5)
pred_original_sample_coeff = (alpha_prod_t_prev ** (0.5) * current_beta_t) / beta_prod_t
current_sample_coeff = current_alpha_t ** (0.5) * beta_prod_t_prev / beta_prod_t
pred_prev_sample = pred_original_sample_coeff * pred_original_sample + current_sample_coeff * sample
区别DDIM的处理过程将DDPM的马尔科夫链替换为非马尔科夫链过程而后进行采样,这样我们就可以每次迭代中跨多个step,从而减少推理迭代次数和时间:
\[x_{t-1}=\sqrt{\alpha_{t-1}}\left(\frac{x_t-\sqrt{1-\alpha_t}\epsilon_\theta(x_t,t)}{\sqrt{\alpha_t}}\right)+\sqrt{1-\alpha_{t-1}-\sigma_t^2}\epsilon_\theta(x_t,t)+\sigma_tz\]std_dev_t = eta * variance ** (0.5)
pred_sample_direction = (1 - alpha_prod_t_prev - std_dev_t**2) ** (0.5) * pred_epsilon
prev_sample = alpha_prod_t_prev ** (0.5) * pred_original_sample + pred_sample_direction
prev_sample = prev_sample + variance
2、pipeline
所有支持的pipeline:Diffusers Pipelines
一般来说很多论文里面提出的模型,基本都是基于SD(StableDiffusion)等模型进行“微调”的,因此很多改进也都是去争对输入模型的参数进行调整(换言之就是搭积木讲故事),比如说改变输入图片内容、改变SD中条件等。除此之外分析一个pipeline直接通过分析里面的__call__即可,基本使用:
from diffusers import StableDiffusionPipeline
import torch

model_id = "runwayml/stable-diffusion-v1-5"
pipe = StableDiffusionPipeline.from_pretrained(model_id, torch_dtype=torch.float16)

if torch.cuda.is_available():
    pipe = pipe.to("cuda")

prompt = "A futuristic city at sunset, cyberpunk style, highly detailed, cinematic lighting"
image = pipe(prompt, num_inference_steps=50, guidance_scale=7.5).images[0]
image.save("output.png")
2.1 StableDiffusionPipeline
https://huggingface.co/docs/diffusers/v0.34.0/en/api/pipelines/overview#diffusers.DiffusionPipeline
很多论文里面基本都是直接去微调训练好的模型比如说StableDiffusion等,使用别人训练后的就少不了看到 pipeline的影子,直接介绍StableDiffusionPipeline的构建(文生图pipeline)。在代码中主要使用到的基础模型如下几个:1、VAE(AutoencoderKL);2、CLIP(用于文本编码,CLIPTextModel、CLIPTokenizer);3、Unet(模型骨架,UNet2DConditionModel)
Step-1:对输入文本进行编码(文生图直接输入文本)通过正、负编码对生成图像进行指导:
def encode_prompt(..., prompt, do_classifier_free_guidance,...,):
    # 1、判断文本编码器是否lora微调
    if lora_scale is not None and isinstance(self, StableDiffusionLoraLoaderMixin):
        self._lora_scale = lora_scale
        if not USE_PEFT_BACKEND:
            adjust_lora_scale_text_encoder(self.text_encoder, lora_scale)
        else:
            scale_lora_layers(self.text_encoder, lora_scale)
    # 2、通过prompt来确定需要生成多少图片
    ...
    # 3、对文本进行编码
    if prompt_embeds is None:
        ...
        text_inputs = self.tokenizer(...)
        text_input_ids = text_inputs.input_ids
            untruncated_ids = self.tokenizer(prompt, padding="longest", return_tensors="pt").input_ids
        ...
        # 会显示一个过长截断警告
        ...
        # 选择clip中倒数第几层作为文本编码输出
        if clip_skip is None:
            # 默认直接最后一层
            prompt_embeds = self.text_encoder(text_input_ids.to(device), attention_mask=attention_mask)
                prompt_embeds = prompt_embeds[0]
        else:
            # 倒数层
            prompt_embeds = self.text_encoder(
                text_input_ids.to(device), attention_mask=attention_mask, output_hidden_states=True
            )
            prompt_embeds = prompt_embeds[-1][-(clip_skip + 1)]
            prompt_embeds = self.text_encoder.text_model.final_layer_norm(prompt_embeds)
        # 改变形状得到 batch_size(对应prompt数量), 77, 748 CLIP: CLIP-ViT-L
        ...
        prompt_embeds = prompt_embeds.view(bs_embed * num_images_per_prompt, seq_len, -1)
    if do_classifier_free_guidance and negative_prompt_embeds is None:
        # 此部分和上面正常的编码处理方式相似直接对negative_prompt进行编码
        ...
    ...
    return prompt_embeds, negative_prompt_embeds
Step-2:获取推理时间步以及生成latent变量
Step-3:模型处理
# 首先通过unet逐步进行解码图像
with self.progress_bar(total=num_inference_steps) as progress_bar:
    for i, t in enumerate(timesteps):
        ...
        noise_pred = self.unet(...)[0]
        ...
        # 通过step来从t反推t-1
        latents = self.scheduler.step(noise_pred, t, latents, **extra_step_kwargs, return_dict=False)[0]
        ...
        # classifier_free_guidance
if not output_type == "latent":
    # 图片返回
    image = self.vae.decode(latents / self.vae.config.scaling_factor, return_dict=False,generator=generator)[0]
    image, has_nsfw_concept = self.run_safety_checker(image, device, prompt_embeds.dtype)
else:
    # 直接返回没被vae处理的结果
    image = latents
    has_nsfw_concept = None

if has_nsfw_concept is None:
    do_denormalize = [True] * image.shape[0]
else:
    do_denormalize = [not has_nsfw for has_nsfw in has_nsfw_concept]
image = self.image_processor.postprocess(image, output_type=output_type, do_denormalize=do_denormalize)
...
if not return_dict:
    return (image, has_nsfw_concept)

return StableDiffusionPipelineOutput(images=image, nsfw_content_detected=has_nsfw_concept)
补充-1:
classifier_free_guidance(CFG) 以及classifier_guidance(CG)classifier_guidance1:通过一个分类器来引导模型生成的方向,也就是使得模型按类进行生成。数学上描述为2:$\nabla p(x_t\vert y)=\nabla \log p(x_t)+ \nabla \log p(y \vert x_t)$ 也就是说前面部分代表unconditional score后面部分代表分类器的梯度,也就是添加一个分类器梯度来“指导”模型生成方向。classifier_free_guidance3:对上面的改进版本,上面过程中会额外训练一个分类器进而增加训练成本。因此对于上面计算公式中:$\nabla \log p(y \vert x_t)= \nabla p(x_t\vert y)- \nabla \log p(x_t)= -\frac{1}{\sqrt{1- \alpha_t}}(\epsilon_\theta(x_t, t, y)- \epsilon_\theta(x_t, t))$ 最后得到梯度过程为: $(w+1)\epsilon_\theta(x_t, t, y)- w\epsilon_\theta(x_t, t)$
回到代码中,代码中具体操作过程为:1、文本编码过程中,这部分比较简单直接根据对negative_prompt进行CLIP text encoder处理即可(如果没有输入negative_prompt默认就是直接用空字符进行替代)如果进行CFG那么直接将两部分进行拼接(torch.cat([negative_prompt_embeds, prompt_embeds])) prompt_embeds;2、模型解码过程中,这部分处理过程比较粗暴,如果要进行CFG那么直接将latent扩展为两份(Uncond+Cond各一份)对应的text输出也是两份,通过一个模型处理之后再通过chunk分出无条件输出、有条件输出,最后计算两部分组合:$\epsilon(x,t)+ w(\epsilon(x,t,y)- \epsilon(x,t))$
if self.do_classifier_free_guidance:
    prompt_embeds = torch.cat([negative_prompt_embeds, prompt_embeds])
...
latent_model_input = torch.cat([latents] * 2) if self.do_classifier_free_guidance else latents
...
noise_pred = self.unet(latent_model_input, t, prompt_embeds, ...)[0]

if self.do_classifier_free_guidance:
    noise_pred_uncond, noise_pred_text = noise_pred.chunk(2)
    noise_pred = noise_pred_uncond + self.guidance_scale * (noise_pred_text - noise_pred_uncond)

if self.do_classifier_free_guidance and self.guidance_rescale > 0.0:
    noise_pred = rescale_noise_cfg(noise_pred, noise_pred_text, guidance_rescale=self.guidance_rescale)
2.2 StableDiffusionXLInpaintPipeline
对于图像消除任务而言使用较多的也是此类pipeline(SDXL开源可以商用)具体使用代码如下:
from diffusers import StableDiffusionXLInpaintPipeline
from diffusers.utils import load_image, make_image_grid
import torch
from PIL import Image

device = "cuda" if torch.cuda.is_available() else "cpu"

# 加载基础模型
base = StableDiffusionXLInpaintPipeline.from_pretrained(
    "stabilityai/stable-diffusion-xl-base-1.0",
    torch_dtype=torch.float16,  # 使用半精度浮点数以减少显存占用
    variant="fp16",             # 使用 fp16 变体以优化性能
    use_safetensors=True        # 使用 safetensors 格式以提高加载速度
).to(device)

# 加载优化模型(refiner model)
refiner = StableDiffusionXLInpaintPipeline.from_pretrained(
    "stabilityai/stable-diffusion-xl-refiner-1.0",
    text_encoder_2=base.text_encoder_2,  # 共享基础模型的第二个文本编码器
    vae=base.vae,                        # 共享基础模型的变分自编码器
    torch_dtype=torch.float16,
    use_safetensors=True,
    variant="fp16",
).to(device)

img_url = "https://raw.githubusercontent.com/CompVis/latent-diffusion/main/data/inpainting_examples/overture-creations-5sI6fQgYIuo.png"
mask_url = "https://raw.githubusercontent.com/CompVis/latent-diffusion/main/data/inpainting_examples/overture-creations-5sI6fQgYIuo_mask.png"
init_image = load_image(img_url)
mask_image = load_image(mask_url)


prompt = "A majestic tiger sitting on a bench"
negative_prompt = "distorted, blurry, low quality"

num_inference_steps = 75
high_noise_frac = 0.7

# 使用基础模型进行初步去噪(输出潜在表示)
base_output = base(
    prompt=prompt,
    negative_prompt=negative_prompt,
    image=init_image,
    mask_image=mask_image,
    num_inference_steps=num_inference_steps,
    denoising_end=high_noise_frac,  # 基础模型处理高噪声阶段
    output_type="latent"           # 输出潜在表示以供优化模型使用
).images

# 使用优化模型进行细节增强
refined_image = refiner(
    prompt=prompt,
    negative_prompt=negative_prompt,
    image=base_output,
    mask_image=mask_image,
    num_inference_steps=num_inference_steps,
    denoising_start=high_noise_frac,  # 优化模型处理低噪声阶段
).images[0]

# 可视化结果
grid = make_image_grid([init_image, mask_image, refined_image.resize((512, 512))], rows=1, cols=3)
grid.save("inpainting_result.png")
refined_image.save("refined_image.png")
首先模型输入主要为如下几个部分:1、文本输入;2、图片输入(正常图片以及mask图片)。首先对于文本编码。对于SDXL模型而言文本会通过两个clip的文本编码器进行编码(OpenCLIP-ViT/G:1280、CLIP-ViT/L:768)对于两个编码器代码处理思路为:
...
tokenizers = [self.tokenizer, self.tokenizer_2] if self.tokenizer is not None else [self.tokenizer_2]
text_encoders = (
    [self.text_encoder, self.text_encoder_2] if self.text_encoder is not None else [self.text_encoder_2]
)

if prompt_embeds is None:
    prompt_2 = prompt_2 or prompt
    prompt_2 = [prompt_2] if isinstance(prompt_2, str) else prompt_2

    prompt_embeds_list = []
    prompts = [prompt, prompt_2]
    for prompt, tokenizer, text_encoder in zip(prompts, tokenizers, text_encoders):
        ...
        text_inputs = tokenizer(prompt,...)
        text_input_ids = text_inputs.input_ids
        untruncated_ids = tokenizer(prompt, ...).input_ids
        ...
        prompt_embeds = text_encoder(text_input_ids.to(device), output_hidden_states=True)
        ...
        prompt_embeds_list.append(prompt_embeds)

    prompt_embeds = torch.concat(prompt_embeds_list, dim=-1)
...
if self.do_classifier_free_guidance:
    prompt_embeds = torch.cat([negative_prompt_embeds, prompt_embeds], dim=0)
    ...
  prompt_embeds = prompt_embeds.to(device)
最后得到的prompt_embeds为:[1, 77, 2048](由[1, 77, 768] 和 [1, 77, 1280])拼接得到,如果要使用CFG的话就需要输入negative_prompt以及参数guidance_scale,对于negative_prompt的处理方式和上面相同。除此之外再代码中会有added_cond_kwargs = {"text_embeds": add_text_embeds, "time_ids": add_time_ids}这个参数,一般作用是:作为一个“额外”的条件添加到时间编码中(emb = emb + aug_emb if aug_emb is not None else emb)。不过值得注意的是,很多论文里面都使用:将图像和文本编码组合作为“文本编码”输入(objectclear)如果要实现这个(objectclear)功能伪代码如下:
...
    masked_image = init_image
    # masked_image = init_image * (mask < 0.5)
    obj_only = init_image * (mask > 0.5)
    obj_only = obj_only.to(device=device)
    object_embeds = self.image_prompt_encoder(obj_only)
prompt_embeds = self.postfuse_module(prompt_embeds, object_embeds, 5)
其中prompt_embeds就是正常的文本编码,self.image_prompt_encoder一般就是使用clip image的文本编码器这样一来就会将文本和图片编码成向量,self.postfuse_module一般就是将两个向量进行融合(这个一般就是通过mlp对齐维度之后直接拼接即可)
而后再图像编码。这部分比较容易直接通过vae去编码即可
...
masked_image = init_image * (mask < 0.5)
...
mask = torch.cat([mask] * 2) if do_classifier_free_guidance else mask
masked_image_latents = self._encode_vae_image(masked_image, generator=generator)
对于图片一般做法是直接masked_image = init_image * (mask < 0.5)但是论文里面有些直接使用masked_image = init_image。在文本以及图像都编码之后就是模型处理,只不过如果使用CFG:
if self.do_classifier_free_guidance:
    noise_pred_uncond, noise_pred_text = noise_pred.chunk(2)
    noise_pred = noise_pred_uncond + self.guidance_scale * (noise_pred_text - noise_pred_uncond)

if self.do_classifier_free_guidance and self.guidance_rescale > 0.0:
    # Based on 3.4. in https://arxiv.org/pdf/2305.08891.pdf
    noise_pred = rescale_noise_cfg(noise_pred, noise_pred_text, guidance_rescale=self.guidance_rescale)
补充一点:如果要做CFG一般会将文本的prompt:negative_prompt_embeds(如果没有输入negative_prompt会直接用0代替), prompt_embeds直接拼接起来,而后其他的就直接“拼接本体”
3、Lora微调
和大语言模型的处理方式相似,通过peft去微调模型,简单了解一下peft里面微调的处理思路(值得注意的是,使用peft来微调只适用于基于transformer库来搭建的模型对于自己的模型可能没那么好的适应性):
unet = UNet2DConditionModel.from_pretrained(
        "stable-diffusion-v1-5/stable-diffusion-inpainting",
        subfolder="unet",
        cache_dir= '/data/huangjie',
    )
unet.requires_grad_(False)
print(unet.down_blocks[0])

unet_lora_config = LoraConfig(
        r=2,
        lora_alpha=2,
        lora_dropout=0.2,
        init_lora_weights="gaussian",
        target_modules=["to_k", "to_q", "to_v", "to_out.0", "add_k_proj", "add_v_proj"],
    )
unet.add_adapter(unet_lora_config)
print("after Lora Model:", unet.down_blocks[0])
上面两个过程模型变化为: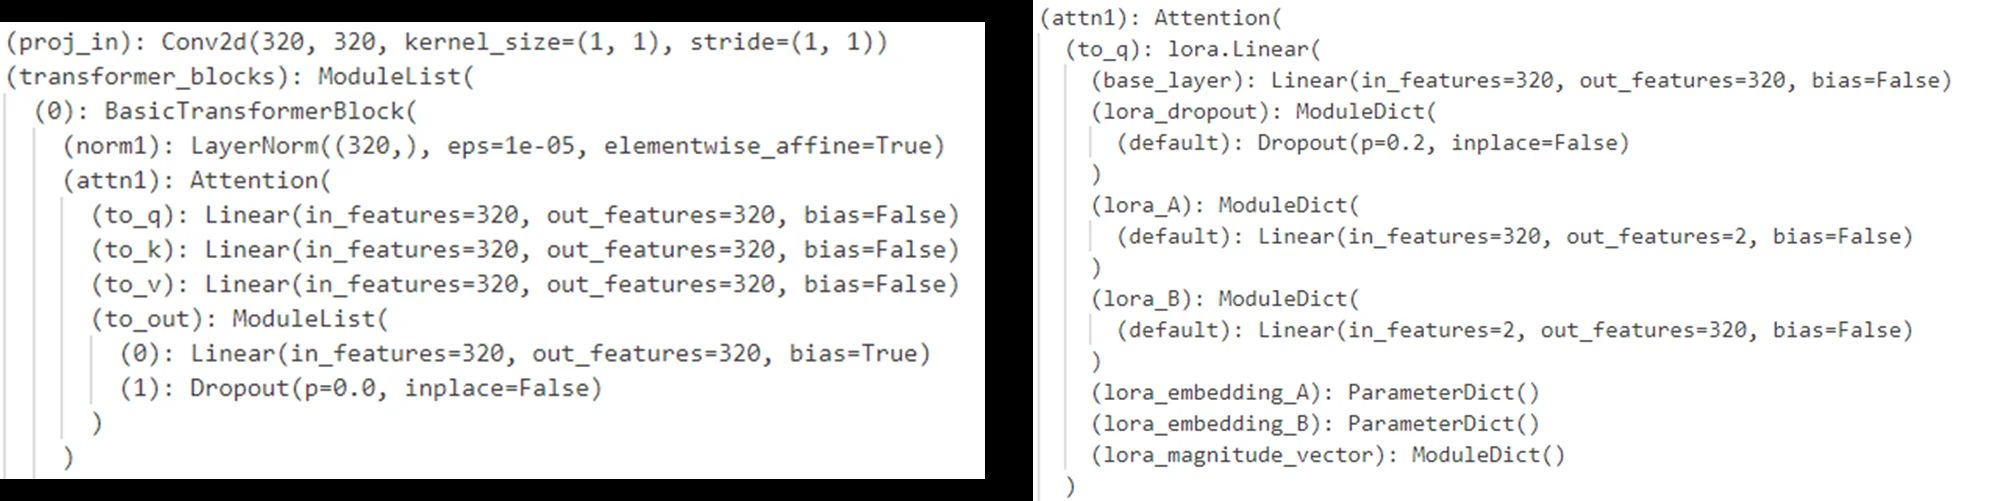
仔细分析一下LoraConfig里面的具体原理,因为很多模型(基于attention)基本就是q、k、v三个,因此通过target_modules指定哪些模块的参数是需要通过lora进行调整的模块。init_lora_weights代表lora初始化参数分布策略,参数r以及 lora_alpha代表的含义是:
\(y=Wx+ \text{Dropout}(\text{B}_{out \times r} \text{A}_{r \times in}x) \times \frac{\text{lora\_alpha}}{r}\)
经典问题:1、lora里面参数里面之所以初始化为0是因为对于我们的llm/DF模型一般都是“优秀”的,而对于“陌生”的数据通过零初始化确保一切干净,从 0 开始稳步适配(在训练初期引入噪声,可能导致不稳定,尤其在微调少步数、低学习率时,收敛更慢)2、多个lora模型同时作用于一个SD模型,并配置他们的各自权重,并且不同lora参数对模型生成的影响4: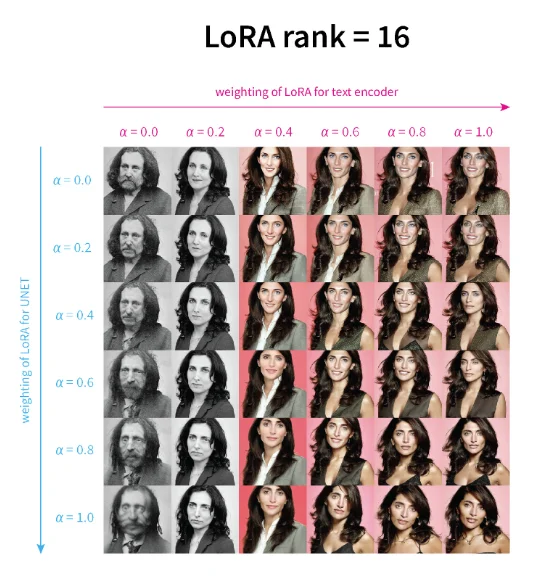
4、Adapters使用
lora也是Adapters(可以简单理解为对训练好的模型再去添加一个插件,通过这个插件让SD去生成其他的样式的图片)一种,具体见:深入浅出了解生成模型-6:常用基础模型与 Adapters等解析
5、自注意力技术(AttnProcessor、AttnProcessor2_0)
https://huggingface.co/docs/diffusers/v0.30.1/en/api/attnprocessor
- 1、AttnProcessor
此部分就是非常常规的注意力计算方式
- 2、AttnProcessor2_0
它调用了 PyTorch 2.0 起启用的算子 F.scaled_dot_product_attention 代替手动实现的注意力计算。这个算子更加高效,如果你确定 PyTorch 版本至少为 2.0,就可以用 AttnProcessor2_0 代替
参考知乎5中的描述,如何将自注意力进行修改,比如说如下代码:
from diffusers.models.attention_processor import (Attention,AttnProcessor,AttnProcessor2_0)
unet = UNet2DConditionModel()
for name, module in unet.named_modules():
   if isinstance(module, Attention) and "attn2" in name:
      print(f'name: {name}')
      print("*"*20)
      break
那么就会得到一个比如说:down_blocks.0.attentions.0.transformer_blocks.0.attn2比如说如果我需要将这个替换那么处理方式为:
for name, module in unet.named_modules():
   if isinstance(module, Attention) and "attn2" in name:
      print(f'raw name: {name} \n raw module: {module.processor}')
      print("*"*20)
      if isinstance(module.processor, AttnProcessor2_0):
         module.set_processor(AttnProcessor())
      print(f"change name: {name} \n change module: {module.processor}")
      print("*"*20)
      break
这样一来有最开始的:<diffusers.models.attention_processor.AttnProcessor2_0 object at 0x7ff392734eb0> 替换为<diffusers.models.attention_processor.AttnProcessor object at 0x7ff5b776bc40>。或者直接改成自定义的处理方式:
class CustonAttnProcessor(AttnProcessor):
    def __call__(self, attn, hidden_states, encoder_hidden_states=None, attention_mask=None):
        query = attn.to_q(hidden_states)
        encoder_states = hidden_states if encoder_hidden_states is None else encoder_hidden_states
        key = attn.to_k(encoder_states)
        value = attn.to_v(encoder_states)

        attn_scores = torch.baddbmm(
            torch.empty(query.shape[0], query.shape[1], key.shape[1], device=query.device),
            query,
            key.transpose(-1, -2),
            beta=0,
            alpha=attn.scale,
        )

        # 比如说对 attn_scores 取log
        attn_probs = torch.log(attn_scores)
        attn_probs = attn_scores.softmax(dim=-1)

        hidden_states = torch.bmm(attn_probs, value)
        hidden_states = attn.to_out[0](hidden_states)
        hidden_states = attn.to_out[1](hidden_states)
        return hidden_states

attn_processor_dict = {}
for k in unet.attn_processors.keys():
    if "attn2" in k:
        attn_processor_dict[k] = CustonAttnProcessor()
    else:
        attn_processor_dict[k] = unet.attn_processors[k]
unet.set_attn_processor(attn_processor_dict)
for name, processor in unet.attn_processors.items():
   print(name, "=>", type(processor))
总的来说如果要去修改注意力处理方式,直接去便利unet.attn_processors.keys()然后去找到需要修改的层将其替换即可,只不过关键在于CustonAttnProcessor的定义方式。
数据合成
参考
https://arxiv.org/abs/2105.05233 ↩
https://zhuanlan.zhihu.com/p/640631667 ↩
https://openaccess.thecvf.com/content/WACV2023/papers/Liu_More_Control_for_Free_Image_Synthesis_With_Semantic_Diffusion_Guidance_WACV_2023_paper.pdf ↩
https://github.com/cloneofsimo/lora/discussions/37 ↩
https://zhuanlan.zhihu.com/p/680035048 ↩