在之前的Blog(https://www.big-yellow-j.top/posts/2025/12/27/vllm-1.html)简单介绍了vllm初始化过程中对于显存的分配过程,本文主要介绍调度器的运行过程(全部是基于:Version: 0.17.1)。
conda create -n vllm_server python=3.12conda activate vllm_serverpip install vllm==0.17.1
首先看vllm中直接使用模型进行推理的过程:
from vllm import LLM, SamplingParams
# model_name 可以直接用本地模型地址
llm = LLM(model='Qwen/Qwen2-0.5B-Instruct', download_dir=cache_dir,...)
sampling_params = SamplingParams(temperature=0.8,...)
prompt_list = ['Please tell me how to acceralate the llm generate!']
outputs = llm.generate(prompt_list, sampling_params)
代码中直接通过LLM去初始化一个大模型而后再去使用generate进行生成,核心去看里面生成过程vllm中是如何处理的,整个过程的运行逻辑如下1:
具体代码中,在generate中(函数涉及到多层的嵌套)模型输入prompt、采样参数等然后会将参数直接输入 _run_completion
def _run_completion(self, prompts, params,....):
    self._add_completion_requests(
        prompts=prompts,
        params=params,
        use_tqdm=use_tqdm,
        lora_request=lora_request,
        priority=priority,
        tokenization_kwargs=tokenization_kwargs,
    )
    return self._run_engine(use_tqdm=use_tqdm, output_type=output_type)
在上述函数中 _add_completion_requests以及 _run_engine 分别起到的作用是:将输入prompt进行processor进行处理而后向llm_engine添加一个request请求(self.llm_engine.add_request)、而后面以后就好理解就是直接进行模型输出,首先判断是不是有没有没有处理完的请求而后逐一的去对请求进行处理。
总结一下 generate 过程:prompt–>处理添加请求(_add_request)–>处理请求(_run_engine)。因此主要去看一下这两个过程是如何处理的
_add_request 过程
主要是将输入的prompt进行编码,然后对输入的prompt去打上id,告诉模型每一次处理的prompt的序号id,以及prompt所对应的采样参数。在代码中处理十分简单在代码中:
def add_request(self, request_id, prompt, params,...) -> str:
    ...
    if isinstance(prompt, EngineCoreRequest):
        ...
    else:
        request = self.input_processor.process_inputs(
            request_id,
            prompt,
            params,
            supported_tasks=self.get_supported_tasks(),
            arrival_time=arrival_time,
            lora_request=lora_request,
            tokenization_kwargs=tokenization_kwargs,
            trace_headers=trace_headers,
            priority=priority,
        )
        prompt_text, _, _ = extract_prompt_components(self.model_config, prompt)

    self.input_processor.assign_request_id(request)
    req_id = request.request_id
    params = request.params
    n = params.n if isinstance(params, SamplingParams) else 1
    if n == 1:
        self.output_processor.add_request(request, prompt_text, None, 0)
        self.engine_core.add_request(request)
        return req_id

    parent_req = ParentRequest(request)
    for idx in range(n):
        request_id, child_params = parent_req.get_child_info(idx)
        child_request = request if idx == n - 1 else copy(request)
        child_request.request_id = request_id
        child_request.sampling_params = child_params
        self.output_processor.add_request(
            child_request, prompt_text, parent_req, idx
        )
        self.engine_core.add_request(child_request)
    return req_id
过程比较简单调用 processor 去对输入进行编码转换为对应的token,对应request的结果为:
EngineCoreRequest(request_id='1', prompt_token_ids=[4340, 525, 575, 11319], mm_features=None, sampling_params=SamplingParams(n=1, presence_penalty=0.0, frequency_penalty=0.0, repetition_penalty=1.05, temperature=0.8, top_p=0.9, top_k=40, min_p=0.0, seed=None, stop=[], stop_token_ids=[151643], bad_words=[], include_stop_str_in_output=False, ignore_eos=False, max_tokens=20, min_tokens=0, logprobs=5, prompt_logprobs=None, skip_special_tokens=True, spaces_between_special_tokens=True, structured_outputs=None, extra_args=None), pooling_params=None, arrival_time=1773562288.0634456, lora_request=None, cache_salt=None, data_parallel_rank=None, prompt_embeds=None, client_index=0, current_wave=0, priority=0, trace_headers=None, resumable=False, external_req_id=None, reasoning_ended=None)
通过EngineCoreRequest进行包裹输出里面主要是请求id、采样参数、文本编码后的token等,也就是相当于每次去请求llm都会告诉模型我问了什么、我的输出参数是什么。除此之外在request中还有几个比较重要的参数:
vllm/v1/request.py
- 1、status
表示当前request的状态,具体有如下几种2:
WAITING:请求刚被创建,在等待队列中等待被调度器调度。这是所有请求的初始状态。
WAITING_FOR_FSM:当请求使用结构化输出功能时,需要等待有限状态机(FSM)编译完成。在此期间,请求处于此状态。
WAITING_FOR_STREAMING_REQ:对于流式输入(如分块传输的提示词),请求在等待下一个输入块时会进入此状态。
WAITING_FOR_REMOTE_KVS:在分离式推理(disaggregated prefill/decode)或KV缓存卸载场景中,请求需要等待远端传输KV缓存数据时,会进入此状态。
PREEMPTED:当KV缓存资源紧张时,调度器可能会抢占一个正在运行的请求,将其放回等待队列以腾出资源给其他请求。被抢占的请求进入此状态。
RUNNING:请求成功获得资源,正在GPU上执行(进行prefill或decode阶段)。这是请求被服务的核心阶段。
FINISHED_STOPPED:请求正常结束。可能的原因包括:生成了终止符(EOS token),或者匹配到了用户指定的stop词或stop token。
FINISHED_LENGTH_CAPPED:请求生成的token数量达到了用户设置的max_tokens限制,因此被停止。
FINISHED_ABORTED:请求被客户端主动取消或中断。
FINISHED_IGNORED:请求因内部错误或状态无效而终止。这通常意味着处理过程出现了异常。
- 2、数量指标
1、num_prompt_tokens:输入prompt的长度;2、num_output_placeholders:表示异步调度中预留但尚未生成的输出令牌占位符数量;3、num_tokens_with_spec:表示包含推测解码tokens数量计算过程:len(prompt_token_ids) + len(output_token_ids) + len(spec_token_ids)==prompt占用token数量+输出tokens数量+推测未来token数量;
_run_engine过程
先去看核心代码:
def _run_engine(...):
    ...
    outputs: list[_O] = []
    while self.llm_engine.has_unfinished_requests():
        step_outputs = self.llm_engine.step()
        for output in step_outputs:
            assert isinstance(output, output_type)
            if output.finished:
                outputs.append(output)
                ...
    return sorted(outputs, key=lambda x: int(x.request_id))
对于上面过程直接去使用 step()进行模型输出,在 step()过程中
llm_engine.step() 过程
具体代码处理过程,详细解释看代码:
# /vllm/v1/engine/llm_engine.py
def step(self) -> list[RequestOutput | PoolingRequestOutput]:
    if self.should_execute_dummy_batch:
        self.should_execute_dummy_batch = False
        self.engine_core.execute_dummy_batch()
        return []

    # 1、模型输出过程得到结果 从 EngineCore 获取模型输出
    with record_function_or_nullcontext("llm_engine step: get_output"):
        outputs = self.engine_core.get_output()

    # 2、将 EngineCore的原始输出进行process处理 把 EngineCore 的原始输出 → 加工成用户能看懂的输出
    with record_function_or_nullcontext("llm_engine step: process_outputs"):
        iteration_stats = IterationStats() if self.log_stats else None
        processed_outputs = self.output_processor.process_outputs(
            outputs.outputs,
            engine_core_timestamp=outputs.timestamp,
            iteration_stats=iteration_stats,
        )
        self.output_processor.update_scheduler_stats(outputs.scheduler_stats)

    # 处理因 stop strings 命中而需要立即中止的请求
    with record_function_or_nullcontext("llm_engine step: abort_requests"):
        self.engine_core.abort_requests(processed_outputs.reqs_to_abort)

    # 记录统计信息(logging / metrics / tracing)
    with record_function_or_nullcontext("llm_engine step: record_stats"):
        if (
            self.logger_manager is not None
            and outputs.scheduler_stats is not None
            and len(outputs.outputs) > 0
        ):
            self.logger_manager.record(
                scheduler_stats=outputs.scheduler_stats,
                iteration_stats=iteration_stats,
                mm_cache_stats=self.renderer.stat_mm_cache(),
            )
            self.do_log_stats_with_interval()

    return processed_outputs.request_outputs
在上面过程中主要有4个过过程中不同过程模型输出内容:
EngineCoreOutputs(engine_index=0,
outputs=[EngineCoreOutput(request_id='1-aadc7e9e',
new_token_ids=[99882],
new_logprobs=LogprobsLists(logprob_token_ids=array([[ 99882,  18493,  99882,  20412, 106789, 105792]], dtype=int32),
logprobs=array([[-1.2735124, -1.2065492, -1.2735124, -1.9096742, -2.8471742,-2.8471742]], dtype=float32), ...)
1、模型输出过程得到结果:这个过程主要是去输出prompt后的第一个token,对于这部分结果中关注点在于logprob_token_ids、logprobs、new_token_ids分别表示我的模型输出的token以及对应的概率以及我的第一个输出token的id(直接从最大的概率进行解码输出即可);
OutputProcessorOutput(
request_outputs=[RequestOutput(request_id=1,
prompt='你是谁?',
prompt_token_ids=[105043, 100165, 11319],
encoder_prompt=None, encoder_prompt_token_ids=None, prompt_logprobs=None,
outputs=[
CompletionOutput(index=0,
text='我叫“小鱼”,我来自海底,我是海里的小鱼,我的小家叫',
token_ids=[35946, 99882, 2073, 30709, 100655, 33590, 35946, 101919, 112002, 3837, 104198, 55135, 102073, 30709, 100655, 3837, 97611, 30709, 45629, 99882],
routed_experts=None, cumulative_logprob=-35.836418479681015,
logprobs=[
{35946: Logprob(logprob=-1.362297773361206, rank=1, decoded_token='我'),...}
{99882: Logprob(logprob=-0.3063066303730011, rank=1, decoded_token='叫'), ...}]
2、将 EngineCore的原始输出进行process处理:这个过程中主要是去看CompletionOutput部分内容,里面的token_ids表示的是从 prompt 之后开始的所有已生成 token id,而在logprobs中则是每一次生成词的概率,而后根据你采样的方式去选择输出。
上面过程知识模型“单步执行”的外层循环,但是有一个新的问题,比如说我的模型这一次直接输入了1w组prompt对于这些在vllm中是如何去处理呢?如何控制处理顺序呢?用下面图片来解释为什么要用调度器(下图过程是基于v0的,注意只是简单介绍一下调度器是工作过程的):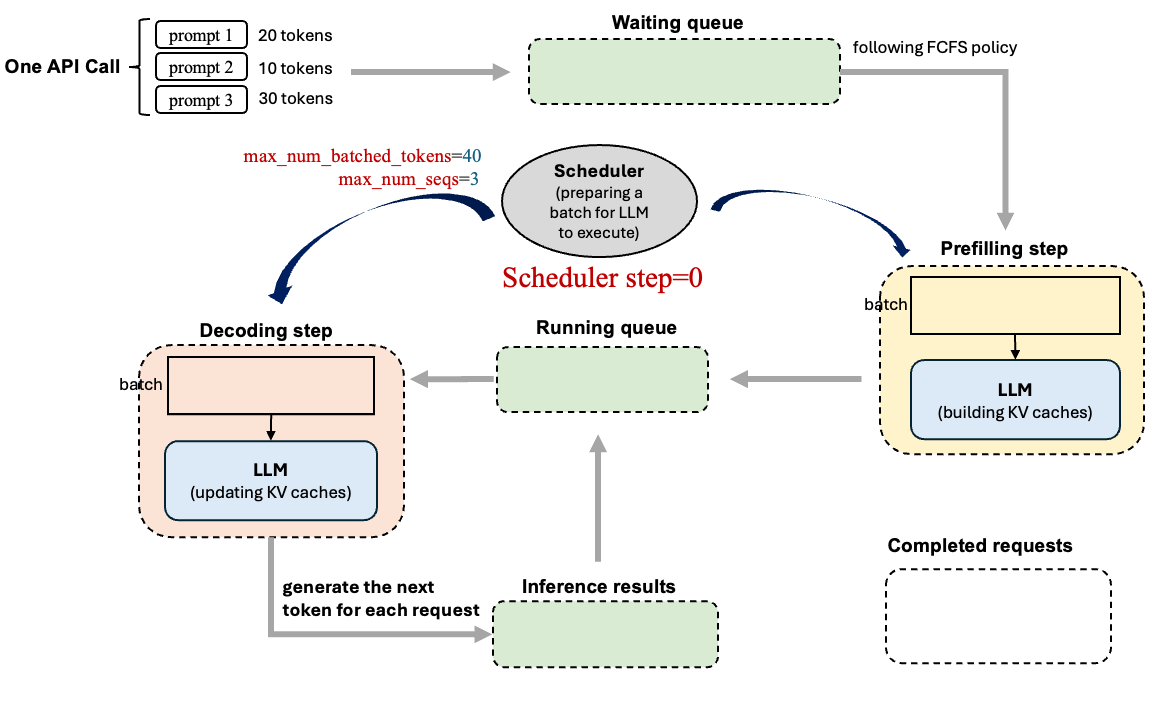
调度器处理过程
在调度器中vllm有两块定义:1、vllm/v1/core/sched/scheduler.py;2、vllm/v1/core/sched/async_scheduler.py。这两部分调度器,后者直接继承前者并且作异步处理,具体使用何种调度器在参数定义 SchedulerConfig中可以使用 (vllm/config/scheduler.py)如果要具体使用何种采样器可以直接指定参数: async_scheduling=True/False 或者在启动server中使用参数 --no-async-scheduling。以 cheduler.py 出发分析其主要功能,在最开始的代码 add_request 中我将我的prompt都已经编码完毕,而后就是对编码后的内容进行处理,在代码中主要有两个队列负责request管理:1、waiting;2、running;这两部分都是python的deque()实例(双端队列,允许你从队列两侧添加或删除元素)
waiting 队列处理过程
对于编码后的所有的request 会直接都存储到 self.waiting 中而后在 waiting 队列中解析遍历内容写入 running 队列中进行执行,因此会从 waiting 中去拿出存储到request中那么代码过程为(主体框架,具体每一部分都在下面其他小的内容中描述):
while self.waiting and token_budget > 0:
    if len(self.running) == self.max_num_running_reqs:
        break
    request = self.waiting.peek_request()
    request_id = request.request_id

    """"""""""""""""""""""""""""""
    # 第一步:对 request 状态进行检查
    """"""""""""""""""""""""""""""

    num_external_computed_tokens = 0
    load_kv_async = False
    connector_prefix_cache_queries, connector_prefix_cache_hits = 0, 0

    """""""""""""""""""""""""""""
    # 第二步:得到已经计算的tokens数量
    """""""""""""""""""""""""""""

    """""""""""""""""""""""""""""
    # 第三步:开始计算本次要为这个请求新增计算/生成的 tokens 数量
    """""""""""""""""""""""""""""

    """""""""""""""""""""""""""""
    # 第四步:开始计算需要缓存的 new_blocks
    """""""""""""""""""""""""""""
对于上述waiting队列处理过程总结如下:首先在while大循环下确定waiting非空以及token_budget还有空余,而后从waiting中取出request,1、去判断request的状态情况,主要是判断这三类:
if request.status == RequestStatus.WAITING_FOR_REMOTE_KVS:...
if request.status == RequestStatus.WAITING_FOR_FSM:...
if request.status == RequestStatus.WAITING_FOR_STREAMING_REQ:...
在完成对request状态判断完毕之后2、得到已经计算的tokens数量,首先去判断request是不是以已经有过计算的tokens,如果没有(request没有被处理)就需要先去计算本地缓存(num_new_local_computed_tokens,先不去管缓存是怎么处理的分配的),以及从connector获取外部缓存(num_external_computed_tokens),最后计算得到 num_computed_tokens = num_new_local_computed_tokens + num_external_computed_tokens。之所以这样是因为:大模型生成过程是 prefill(编码prompt)+decode(正式生成),如果最开始我的token在我的block中已经被缓存了那么可以直接拿出进行复用(可以理解为prompt中有被处理过的token)
if request.num_computed_tokens == 0:
  # 本地缓存(本机 KV Cache Manager)
  new_computed_blocks, num_new_local_computed_tokens = self.kv_cache_manager.get_computed_blocks(request)
  # 外部缓存(通过 KVConnector,例如分布式 KV 转移、SharedStorage、LMCache、Offloading 等)
  if self.connector is not None:
    ext_tokens, load_kv_async = self.connector.get_num_new_matched_tokens(request, num_new_local_computed_tokens)

    request.num_external_computed_tokens = ext_tokens
    num_external_computed_tokens = ext_tokens

  num_computed_tokens = num_new_local_computed_tokens + num_external_computed_tokens
else:
   new_computed_blocks = self.kv_cache_manager.empty_kv_cache_blocks
   num_new_local_computed_tokens = 0
   num_computed_tokens = request.num_computed_tokens
在得到需要计算的tokens之后 3、去计算本地需要生成多少tokens,在上一步中得到这个request已经被计算的tokens数量,那么就需要计算本次还需要新计算/处理的 token 数量。在request.num_tokens表示的是当前总共拥有的 token 数量(prompt + 已经生成的 output tokens)
if load_kv_async:
  assert num_external_computed_tokens > 0
  num_new_tokens = 0
else:
  num_new_tokens = request.num_tokens - num_computed_tokens
  threshold = self.scheduler_config.long_prefill_token_threshold
  if 0 < threshold < num_new_tokens:
    num_new_tokens = threshold
第二步中查找前缀缓存命中(Prefix Cache Hit),确定“这个请求已经有哪一部分 KV 可以直接复用,不需要重新计算”,第三步中则是决定本次调度循环实际要处理多少新 tokens(num_new_tokens)
在得到本地需要生成新的token之后就需要 4、计算这些新的需要计算的token需要计算的block数量
new_blocks = self.kv_cache_manager.allocate_slots(
    request,
    num_new_tokens,
    num_new_computed_tokens=num_new_local_computed_tokens,
    new_computed_blocks=new_computed_blocks,
    num_lookahead_tokens=effective_lookahead_tokens,
    num_external_computed_tokens=num_external_computed_tokens,
    delay_cache_blocks=load_kv_async,
    num_encoder_tokens=num_encoder_tokens,
)
在得到需要计算的blocks之后就是将 5、waiting队列中内容加入到running队列中去进行计算了
request = self.waiting.pop_request()
if load_kv_async:
    # If loading async, allocate memory and put request
    # into the WAITING_FOR_REMOTE_KV state.
    skipped_waiting_requests.prepend_request(request)
    request.status = RequestStatus.WAITING_FOR_REMOTE_KVS
    continue

self.running.append(request)
总结一下 waiting 队列处理过程:1、取出一条request,去判断当前这条request的状态;2、计算当前request有多少token是被计算的(因为llm生成是 prefill+deocde),如果远程缓存中有了直接用远程缓存;3、计算需要新计算的tokens数量;4、对新的计算的tokens去分配block;5、加入到running中。对于waiting中几个关键参数设置如下:
1、token_budget:代表本次Step可处理的“新 Token 总数上限”。该参数在每次调度开始时都会根据 max_num_batched_tokens 进行初始化重置,用于约束本轮迭代的计算规模,防止单次推理耗时过长或显存溢出。
其具体消耗过程在每次step中优先被用于running(decode)使用,当所有的在running中prompt的被decode 处理完毕之后(也就是解码完毕)还有剩余的就回去waiting队列中去取prompt进行prefill。通过这样并行就会让vllm效率高处理快
2、long_prefill_token_threshold:如果一个 waiting 请求的 prompt 超长(> threshold),就强制切成小块,防止它一次性吃掉整个 token_budget,导致其他请求饿死。对应参数 long_prefill_token_threshold=1024
3、enable_prefix_caching:开始prefix缓存复用
4、max_num_seqs:最大并发数
简单列子解释调度过程
假如 request=[R1, R2] 分别都有3000和1000个tokens,我的参数配置是max_num_batched_tokens=2048(对应token_budget)、long_prefill_token_threshold=1024(最长处理1024长的prompt 对应long_prefill_token_threshold)、max_new_tokens=100(最大生成200个新的toknes假设没有eos去终止生成)
| 时间 | waiting 队列 | running 队列 | token_budge | R1-num_new_tokens | R1-num_computed_tokens | R2-num_new_tokens | R2-num_computed_tokens |
|---|---|---|---|---|---|---|---|
| t0 | [R1, R2] | [] | 2048 | 0 | 0 | 0 | 0 |
| t1 | [] | [R1,R2] | 2048->24 | 0 | 1024 | 0 | 1000 |
| t2 | [] | [R1,R2] | 2048->1023 | 0 | 2028 | 1 | 1001 |
| t3 | [] | [R1,R2] | 2048->1095 | 0 | 3000 | 2 | 1002 |
| t4 | [] | [R1,R2] | 2048->2046 | 1 | 3001 | 3 | 1003 |
在最开始中R1是不够的因此需要被切分到最长内容(1024)而后R2去使用剩下的(1024)刚刚好满足1000token就会剩余24,那么下次调度过程中就会生成新的token_budge而后依次类推,只有当prompt的token完全被吃下之后才会去解码生成!一个更加极端情况,如果token_budge设置为1024,那么只有当先进的prompt被吃完才会去处理下一个prompt(此时先进的prompt就会在running队列中)。因此为了加速vllm过程可以适当的加大token_budge参数让其可以吃的更多。
running 队列处理过程
区别waiting需要不断调度请求,running相对比较简单,只需要将request进行block管理即可,整体过程如下
req_index = 0
while req_index < len(self.running) and token_budget > 0:
    request = self.running[req_index]
    """"""""""""""""""""""""""""""
    # 第一步、计算需要生成多少新的tokens
    """"""""""""""""""""""""""""""

    """"""""""""""""""""""""""""""
    # 第二步、进行资源抢占
    """"""""""""""""""""""""""""""

    """"""""""""""""""""""""""""""
    # 第三步、“执行”模型进行处理
    """"""""""""""""""""""""""""""
在读取得到新的请求之后,1、先去计算需要生成多少新的tokens(对应计算num_new_tokens)这个过程主要是如下(具体解释看代码):
if (request.num_output_placeholders > 0 and request.num_computed_tokens + 2 - request.num_output_placeholders>= request.num_prompt_tokens + request.max_tokens
):
    req_index += 1
    continue
#  总tokens+ 异步预留tokens- 已经计算的tokens 就得到需要新生成tokens
num_new_tokens = (request.num_tokens_with_spec # 对于这个值一般就是对于 prompt tokens数量
                  + request.num_output_placeholders # 一般在 prefill 阶段是0 进入decoding阶段之后就是 1
                  - request.num_computed_tokens # 被计算的tokens
                  )
# 避免 prompt 过长直接全部占满
if 0 < self.scheduler_config.long_prefill_token_threshold < num_new_tokens:
    num_new_tokens = self.scheduler_config.long_prefill_token_threshold
# 依次调度中 只能生成 token_budge
num_new_tokens = min(num_new_tokens, token_budget)
num_new_tokens = min(num_new_tokens, self.max_model_len - 1 - request.num_computed_tokens)

# 这块主要是处理多模态模型中token它在计算这一步要处理多少文本 Token 的同时,检查是否有“多模态数据(图像/视频/音频)”挡在路中间。如果有,就先分配计算资源给 Encoder(视觉/音频编码器)去处理这些输入。
if request.has_encoder_inputs:
    (encoder_inputs_to_schedule,num_new_tokens,new_encoder_compute_budget,external_load_encoder_input,) = self._try_schedule_encoder_inputs(request,request.num_computed_tokens,num_new_tokens,encoder_compute_budget,shift_computed_tokens=1 if self.use_eagle else 0,
    )
估算需要新生成多tokens,除此之外还需要报错新生成tokens数量不能超过token_budge。在得到需要新生成tokens之后,2、进行资源的抢占,知道需要新生成的tokens数量之后,显卡不一定能够吃下这么多的tokens,就需要进行资源抢占
with record_function_or_nullcontext("schedule: allocate_slots"):
    while True:
        new_blocks = self.kv_cache_manager.allocate_slots(request,num_new_tokens,num_lookahead_tokens=self.num_lookahead_tokens,)

        if new_blocks is not None:
            break
        # 优先级策略
        if self.policy == SchedulingPolicy.PRIORITY:
            preempted_req = max(self.running, key=lambda r: (r.priority, r.arrival_time),)
            self.running.remove(preempted_req)
            if preempted_req in scheduled_running_reqs:
                preempted_req_id = preempted_req.request_id
                scheduled_running_reqs.remove(preempted_req)
                token_budget += num_scheduled_tokens.pop(preempted_req_id)
                req_to_new_blocks.pop(preempted_req_id)
                scheduled_spec_decode_tokens.pop(preempted_req_id, None)
                preempted_encoder_inputs = scheduled_encoder_inputs.pop(
                    preempted_req_id, None
                )
                if preempted_encoder_inputs:
                    num_embeds_to_restore = sum(
                        preempted_req.get_num_encoder_embeds(i)
                        for i in preempted_encoder_inputs
                    )
                    encoder_compute_budget += num_embeds_to_restore
                req_index -= 1
        else:
            # 直接末尾踢掉
            preempted_req = self.running.pop()

        self._preempt_request(preempted_req, scheduled_timestamp)
        preempted_reqs.append(preempted_req)
        if preempted_req == request:
            break
对于资源抢占过程中,首先通过kv_cache_manager去计算对于request以及nun_new_tokens需要多少block,如果显卡还有显存,那么就直接给他分配,如果显存不过就需要进行资源抢占,1、PRIORITY(优先级策略):直接找到running中队列中 优先级最低 且 到达时间最晚 的请求。 preempted_req = max(self.running, key=lambda r: (r.priority, r.arrival_time),)直接将他踢掉,而后释放这个request占用的 token_budget;2、直接踢掉末尾。在获取需要踢掉的request之后self._preempt_request去释放kv_cache、编码显存占用、重置状态为PREEMPTED将其放到waiting中。通过第一、二步计算了模型的新生成的tokens数量,并且根据这些数量对资源进行抢占,那么 3、调用模型“执行”,并非真的执行,前面两步拿到了模型整个过程中所有的需要的资源,就带着这些资源给模型进行执行。
# 首先将 request 加到 需要running “名单” 并且扣除 token预算
scheduled_running_reqs.append(request)
request_id = request.request_id
req_to_new_blocks[request_id] = new_blocks
num_scheduled_tokens[request_id] = num_new_tokens
token_budget -= num_new_tokens
req_index += 1
# 计算 在这一步分配的 Token 中,有多少是真正用于“推测”
if request.spec_token_ids:
    num_scheduled_spec_tokens = (
        num_new_tokens
        + request.num_computed_tokens
        - request.num_tokens
        - request.num_output_placeholders
    )
简单总结一下running过程:1、确定需要处理多少新的tokens,一般计算过程:总tokens数量(prompt的token数量+生成token数量,在prefill阶段没有生成那么就等于prompt长度,后续decoding阶段有生成就会增加这个数值)+预占用token数量(prefill阶段==0,decoding阶段==1)-已经处理的tokens数量,然后还需要将其控制在 token_budge下不能超过他;2、而后进行资源抢占,如果计算的 新生成的token可以满足显存分配,那么就为其分配,如果不满足就直接:1、踢出running队列中末尾的请求;2、或者提出优先级最低、时间最晚的请求。在确定好之后就需要将 剔除的资源进行释放;3、拿着前面两步内容去下一步让模型进行输出。
总结
llm生成过程中主要是prefill(编码prompt)+decode(解码输出),在调度过程中总结就是:先进先处理(对于先进入的request会一直占用直到被prefill完毕后才会给下一个prompt进行处理),run优先并行处理(进入running优先使用token预算,剩下预算的给下一个prompt进行prefill或者decode)。里面每次处理都会使用token预算(对应参数 max_num_batched_tokens),本次调度token预算用完进行下一次,并且调度值有限被running处理。
几个核心参数:
1、token_budget:代表本次Step可处理的“新 Token 总数上限”。该参数在每次调度开始时都会根据 max_num_batched_tokens 进行初始化重置,用于约束本轮迭代的计算规模,防止单次推理耗时过长或显存溢出。
2、long_prefill_token_threshold:如果一个 waiting 请求的 prompt 超长(> threshold),就强制切成小块,防止它一次性吃掉整个 token_budget,导致其他请求饿死。对应参数 long_prefill_token_threshold=1024
3、enable_prefix_caching:开始prefix缓存复用
4、max_num_seqs:最大并发数
5、num_prompt_tokens:输入prompt的长度;
6、num_output_placeholders:表示异步调度中预留但尚未生成的输出令牌占位符数量;
7、num_tokens_with_spec:表示包含推测解码tokens数量计算过程:len(prompt_token_ids) + len(output_token_ids) + len(spec_token_ids)==prompt占用token数量+输出tokens数量+推测未来token数量;