从代码角度去理解QwenVL2.5是如何处理,以及结合实际操作理解如何去对一个QwenVL2.5-3B进行SFT和强化学习处理。
简单了解一下QwenVL2.5模型的整个处理过程,模型整体过程大致为:1、首先是通过模板化处理我的模型的输入(image+text);2、将输入转化为编码形式(比如文本tokenizer处理等);3、出入模型处理输入然后模型输出;4、解码输出内容。整体主要是上述4个过程,因此下面逐一了解一下模型到底在做什么。
内容较多对于强化学习部分之间看最后的总结部分即可:
1、trl框架下PPO代码总结;
2、trl框架下DPO代码总结;
3、trl框架下GRPO代码总结
QwenVL的基本使用
1、模板化模型输入
messages = [
    {
        "role": "user",
        "content": [
            {
                "type": "image",
                "image": "https://qianwen-res.oss-cn-beijing.aliyuncs.com/Qwen-VL/assets/demo.jpeg",
            },
            {"type": "text", "text": "Describe this image."},
        ],
    }
]

text = processor.apply_chat_template(messages, tokenize=False, add_generation_prompt=True)
所谓模板化模型的输入,很容易理解(通过processor.apply_chat_template把对话 messages 转成模型能理解的 prompt,不过值得注意的是不同模型可能处理的方式不同),就是将我的内容“填充”到模板中模拟对话内容,比如说上面处理得到的一个简单结果就是:
<|im_start|>system
You are a helpful assistant.<|im_end|>
<|im_start|>user
<|vision_start|><|image_pad|><|vision_end|>Describe this image.<|im_end|>
<|im_start|>assistant
一般在data_loader里面就会提前将我们的模型需要的输入处理好,比如说我们定义如下的模板
def format_data(self, image, text, prompt):
    # self.SYSTEM_MESSAGE = """You are a helpful assistant."""
    return [
        {
            "role": "system",
            "content": [{"type": "text", "text": self.SYSTEM_MESSAGE}],
        },
        {
            "role": "user",
            "content": [
                {
                    "type": "image",
                    "image": image,
                },
                {
                    "type": "text",
                    "text": prompt
                },
            ],
        },
        {
            "role": "assistant",
            "content": [{"type": "text", "text": text}],
        },
    ]
"""
<|im_start|>system
You are a helpful assistant.<|im_end|>
<|im_start|>user
<|vision_start|><|image_pad|><|vision_end|>This is a prompt<|im_end|>
<|im_start|>assistant
This is a text<|im_end|>
<|im_start|>assistant
"""
对于上面内容输出理解,首先 <|im_start|>....<|im_end|>一般是一组“发言”的开始和结束标记,而后里面内容就是我们的文本/图像内容,user/ assistant/ system 则是分别代表:用户、模型、角色(告诉模型今天扮什么角色)。<|vision_start|>...<|vision_end|>:表示图像输入的占位符,告诉模型这里有一段视觉信息。<|image_pad|>:图像实际的 embedding 会在这里替换(填充),不是文字,而是图像编码后的向量。值得注意的是 assistant后面的内容就是 模型需要输出的文本内容。上面过程很容易理解,只不过需要注意如下问题,因为QwenVL2.5对于分辨率是存在处理(一般直接通过smart_resize处理,后续有介绍),因此如果涉及到目标识别,可能需要提前将坐标进行转换避免分辨率不同导致bbox对应不上的问题
2、编码模板输入
image_inputs, video_inputs = process_vision_info(messages)
inputs = processor(
    text=[text],
    images=image_inputs,
    videos=video_inputs,
    padding=True,
    return_tensors="pt",
)
编码模板输入就比较简单,因为我的输入都是文本/图片,此过程就是需要将这些内容转化为编码形式(比如tokenizer处理等),处理方式如下:
- 1、process_vision_info:返回我的图像/视频输出(都存储在list中)
首先是过extract_vision_info从我上面的内容中提取出图片/视频([{'type': 'image', 'image': 'https://qianwen-res.oss-cn-beijing.aliyuncs.com/Qwen-VL/assets/demo.jpeg'}])提取完毕之后就是交给处理图片/视频的函数进行处理
图片处理过程(fetch_image)此过程也会比较简单,首先去判断类型(是Image.Image对象/图片链接等)然后打开图片,而后就是确定图片分辨率尺寸,有两种smart_resize处理方式,第一种是直接通过:resized_height 和 resized_width来确定改变,另外一种直接通过 min_pixels 和 max_pixels 来处理图像尺寸。对于smart_rezie函数处理过程为:
def smart_resize(
    height: int, width: int, factor: int = IMAGE_FACTOR, min_pixels: int = MIN_PIXELS, max_pixels: int = MAX_PIXELS)
    # IMAGE_FACTOR= 28
    if max(height, width) / min(height, width) > MAX_RATIO:
        ...
    h_bar = max(factor, round_by_factor(height, factor)) # round(number / factor) * factor
    w_bar = max(factor, round_by_factor(width, factor))
    if h_bar * w_bar > max_pixels:
        beta = math.sqrt((height * width) / max_pixels)
        h_bar = floor_by_factor(height / beta, factor) # 按比例缩小并向下取整  math.floor(number / factor) * factor
        w_bar = floor_by_factor(width / beta, factor)
    elif h_bar * w_bar < min_pixels:
        beta = math.sqrt(min_pixels / (height * width))
        h_bar = ceil_by_factor(height * beta, factor) # 按比例放大并向上取整 math.ceil(number / factor) * factor
        w_bar = ceil_by_factor(width * beta, factor)
    return h_bar, w_bar
上面3个小的子函数表示:计算factor倍数、向上取整计算倍数、向下取整计算倍数,对于smart_resize(去实现动态分辨率)函数:通过四舍五入的方式,重新设置图片的 h 和 w 值,确保它们可以被28整除,这样一来就得到了图像的需要修改的尺寸了,比如说:
输入: 一张 1000x500 的图像
计算基础尺寸:round(1000/28)=36, round(500/28)=18 → 1008x504
检查像素数:1008504 = 508,032 > MAX_PIXELS(200,704)
计算缩放系数:beta = sqrt(1000500/200704) ≈ 1.58
最终尺寸:floor(1000/1.58)=632, floor(500/1.58)=316 → 616x308(28的倍数)
视频处理过程(fetch_video)对于视频处理和图像处理相类似打开–>改变尺寸。只不过在打开过程中QwenLV2.5处理过程为:
def fetch_video(ele: dict, image_factor: int = IMAGE_FACTOR, return_video_sample_fps: bool = False):
    if isinstance(ele["video"], str):
        video_reader_backend = get_video_reader_backend()
        try:
            video, sample_fps = VIDEO_READER_BACKENDS[video_reader_backend](ele)
        except Exception as e:
            logger.warning(f"video_reader_backend {video_reader_backend} error, use torchvision as default, msg: {e}")
            video, sample_fps = VIDEO_READER_BACKENDS["torchvision"](ele)
    ...
对于VIDEO_READER_BACKENDS设计了3中不同范式:1、_read_video_decord;2、_read_video_torchvision;3、_read_video_torchcodec。
_read_video_decord
def _read_video_decord(
    ele: dict,
) -> (torch.Tensor, float):
    """read video using decord.VideoReader

    Args:
        ele (dict): a dict contains the configuration of video.
        support keys:
            - video: the path of video. support "file://", "http://", "https://" and local path.
            - video_start: the start time of video.
            - video_end: the end time of video.
    Returns:
        torch.Tensor: the video tensor with shape (T, C, H, W).
    """
    import decord
    video_path = ele["video"]
    st = time.time()
    vr = decord.VideoReader(video_path)
    total_frames, video_fps = len(vr), vr.get_avg_fps()
    start_frame, end_frame, total_frames = calculate_video_frame_range(
        ele,
        total_frames,
        video_fps,
    ) # 得到视频的开始 结束 总结多少帧
    nframes = smart_nframes(ele, total_frames=total_frames, video_fps=video_fps)
    idx = torch.linspace(start_frame, end_frame, nframes).round().long().tolist()
    video = vr.get_batch(idx).asnumpy()
    video = torch.tensor(video).permute(0, 3, 1, 2)  # Convert to TCHW format
    ...
    sample_fps = nframes / max(total_frames, 1e-6) * video_fps
    return video, sample_fps
对于其中的 calculate_video_frame_range函数处理过程也很简单(直接去计算视频开始、结束、总共多少帧),而后类似动态分辨率(smart_resize中成立相类似的)对于视频会通过智能视频帧数计算算法(smart_nframes),用于确定从视频中提取多少帧作为模型输入,处理过程为:第一种直接通过round_by_factor(ele["nframes"], FRAME_FACTOR)来得到帧数;第二种处理方式为(FPS_MIN_FRAMES = 4、FRAME_FACTOR = 2、FPS_MAX_FRAMES = 768、FPS = 2.0):
fps = ele.get("fps", FPS)
min_frames = ceil_by_factor(ele.get("min_frames", FPS_MIN_FRAMES), FRAME_FACTOR)
max_frames = floor_by_factor(ele.get("max_frames", min(FPS_MAX_FRAMES, total_frames)), FRAME_FACTOR)
nframes = total_frames / video_fps * fps
nframes = min(min(max(nframes, min_frames), max_frames), total_frames)
nframes = floor_by_factor(nframes, FRAME_FACTOR)

"""
config = {"nframes": 24}
result = smart_nframes(config, total_frames=100, video_fps=30)
# 输出:24(直接使用配置值)

config = {"fps": 10, "min_frames": 16, "max_frames": 32}
result = smart_nframes(config, total_frames=100, video_fps=30)
# 计算:100/30*10 ≈ 33.33 → 约束到32 → 对齐到32(FRAME_FACTOR=8的倍数)
"""
- 2、processor:去将图片/文本进行编码
其中对于文本编码直接通过 self.tokenizer 来处理,而对于图像直接通过 self.image_processor来处理。首先在 代码中很容易看到使用的图像/文本处理方式image_processor_class = "AutoImageProcessor" 对于文本处理方式 tokenizer_class = ("Qwen2Tokenizer", "Qwen2TokenizerFast")。
对于图片处理方式的 Qwen2VLImageProcessor(代码)的处理思路:
class Qwen2VLImageProcessor(BaseImageProcessor):
    def __init(...):
        ...
    def _preprocess(self, images, ...):
        ...
        height, width = get_image_size(images[0], channel_dim=input_data_format)
        resized_height, resized_width = height, width
        processed_images = []
        # Step-1
        for image in images:
            if do_resize:
                resized_height, resized_width = smart_resize(
                    height,
                    width,
                    factor=self.patch_size * self.merge_size,
                    min_pixels=self.min_pixels,
                    max_pixels=self.max_pixels,
                )
                image = resize(
                    image, size=(resized_height, resized_width), resample=resample, input_data_format=input_data_format
                )
            if do_rescale:
                image = self.rescale(image,...)
            if do_normalize:
                image = self.normalize(image,...)
        # Step-2
        patches = np.array(processed_images)
        if data_format == ChannelDimension.LAST:
            patches = patches.transpose(0, 3, 1, 2)
        if patches.shape[0] % self.temporal_patch_size != 0:
            # 视频补帧处理
            repeats = np.repeat(patches[-1][np.newaxis], self.temporal_patch_size - 1, axis=0)
            patches = np.concatenate([patches, repeats], axis=0)
        # 计算不同 patch 网格大小
        channel = patches.shape[1]
        grid_t = patches.shape[0] // self.temporal_patch_size
        grid_h, grid_w = resized_height // self.patch_size, resized_width // self.patch_size

        patches = patches.reshape(
            grid_t,
            self.temporal_patch_size,
            channel,
            grid_h // self.merge_size,
            self.merge_size,
            self.patch_size,
            grid_w // self.merge_size,
            self.merge_size,
            self.patch_size,
        )
        patches = patches.transpose(0, 3, 6, 4, 7, 2, 1, 5, 8)
        flatten_patches = patches.reshape(
            grid_t * grid_h * grid_w, channel * self.temporal_patch_size * self.patch_size * self.patch_size
        )

        return flatten_patches, (grid_t, grid_h, grid_w)
对于上面处理过程中,首先对于 _preprocess主要是对图像进行一些预处理:1、do_resize:改变图片大小(直接通过smrt_resize进行处理)2、do_rescale:像素缩减到0-1之间;3、do_normalize:对图片进行归一化处理(通道维度);而后直接对于预处理后的图像直接进行切割处理为不同的patch输入到Vit中。
回顾一下QwenVL2.5的图片处理过程:首先是去对图片进行改变尺寸(保证图片最后可以整除patch_size)/缩放/归一化。而后就是直接将图片处理为vit能够处理的“序列输入”得到的维度为:[grid_t * grid_h * grid_w, channel * temporal_patch_size(2) * patch_size(14) * patch_size(14)]。
补充一:图片输入具体例子说明
假设默认参数为:patch_size= 14, temporal_patch_size= 2, merge_size= 2
图像输入为(通过process_vision_info提前处理之后的维度):(1092, 1568)
首先计算resized_height, resized_width = smart_resize得到 812 1176
首先计算:grid_t=1,grit_h=812//14=58,grid_w=1176//14=84那么计算得到为 4872另外一项为 1176也就是最后图像处理得到的输出为:(1*58*84, 14*14*2*3)=(4872,1176)
补充二:对于 smart_resize快速估算最后大小:
先 round 到 factor 的倍数
如果超出 max_pixels → 除以 sqrt(HW/max_pixels),floor → factor 倍数
如果小于 min_pixels → 乘以 sqrt(min_pixels/HW),ceil → factor 倍数
其实也就是:首先将图像处理到为factor倍数的分辨率,而后去判断和max_pixels和min_pixels之间大小,大于前者就缩小,小于前者就放大
最后通过一系列编码之后得到输出:
inputs = processor(
    text=[text],
    images=image_inputs,
    videos=video_inputs,
    padding=True,
    return_tensors="pt",
)
"""
input_ids: torch.Size([1, 1243])
attention_mask: torch.Size([1, 1243])
pixel_values: torch.Size([4872, 1176])
image_grid_thw: torch.Size([1, 3])
"""
3、模型输入处理
generated_ids = model.generate(**inputs, max_new_tokens=128)
整体模型输入处理,输入模型也就是上面编码模板输入几个部分,只不过主要就是如下几个处理:首先是模型处理输入 input_ids 以及我的图像 pixel_values(inputs_embeds = self.model.embed_tokens(input_ids)代码),而后将输入进行位置编码处理(代码),最后输出模型结果(代码),对于QwenVL2.5完整模型结构:
Qwen2_5_VLForConditionalGeneration(
  (model): Qwen2_5_VLModel(
    (visual): Qwen2_5_VisionTransformerPretrainedModel(
      (patch_embed): Qwen2_5_VisionPatchEmbed(
        (proj): Conv3d(3, 1280, kernel_size=(2, 14, 14), stride=(2, 14, 14), bias=False)
      )
      (rotary_pos_emb): Qwen2_5_VisionRotaryEmbedding()
      (blocks): ModuleList(
        (0-31): 32 x Qwen2_5_VLVisionBlock(
          (norm1): Qwen2RMSNorm((1280,), eps=1e-06)
          (norm2): Qwen2RMSNorm((1280,), eps=1e-06)
          (attn): Qwen2_5_VLVisionAttention(
            (qkv): Linear(in_features=1280, out_features=3840, bias=True)
            (proj): Linear(in_features=1280, out_features=1280, bias=True)
          )
          (mlp): Qwen2_5_VLMLP(
            (gate_proj): Linear(in_features=1280, out_features=3420, bias=True)
            (up_proj): Linear(in_features=1280, out_features=3420, bias=True)
            (down_proj): Linear(in_features=3420, out_features=1280, bias=True)
            (act_fn): SiLU()
          )
        )
      )
      (merger): Qwen2_5_VLPatchMerger(
        (ln_q): Qwen2RMSNorm((1280,), eps=1e-06)
        (mlp): Sequential(
          (0): Linear(in_features=5120, out_features=5120, bias=True)
          (1): GELU(approximate='none')
          (2): Linear(in_features=5120, out_features=2048, bias=True)
        )
      )
    )
    (language_model): Qwen2_5_VLTextModel(
      (embed_tokens): Embedding(151936, 2048)
      (layers): ModuleList(
        (0-35): 36 x Qwen2_5_VLDecoderLayer(
          (self_attn): Qwen2_5_VLAttention(
            (q_proj): Linear(in_features=2048, out_features=2048, bias=True)
            (k_proj): Linear(in_features=2048, out_features=256, bias=True)
            (v_proj): Linear(in_features=2048, out_features=256, bias=True)
            (o_proj): Linear(in_features=2048, out_features=2048, bias=False)
            (rotary_emb): Qwen2_5_VLRotaryEmbedding()
          )
          (mlp): Qwen2MLP(
            (gate_proj): Linear(in_features=2048, out_features=11008, bias=False)
            (up_proj): Linear(in_features=2048, out_features=11008, bias=False)
            (down_proj): Linear(in_features=11008, out_features=2048, bias=False)
            (act_fn): SiLU()
          )
          (input_layernorm): Qwen2RMSNorm((2048,), eps=1e-06)
          (post_attention_layernorm): Qwen2RMSNorm((2048,), eps=1e-06)
        )
      )
      (norm): Qwen2RMSNorm((2048,), eps=1e-06)
      (rotary_emb): Qwen2_5_VLRotaryEmbedding()
    )
  )
  (lm_head): Linear(in_features=2048, out_features=151936, bias=False)
)
- 首先:对于视觉部分处理(
Qwen2_5_VisionTransformerPretrainedModel)
对于视觉模型主要需要处理的就是
pixel_values,假设输入的pixel_values信息为:[4872, 1176],image_grid_thw为: [1, 84, 58](就是对应grid_t、grid_h、grid_w这三个数值)
主要包括如下几个模块:
1、Qwen2_5_VisionPatchEmbed:主要进行处理通过一个 Conv3d处理,处理过程也就是说首先将输入的维度进行修改得到:view(-1, self.in_channels, self.temporal_patch_size, self.patch_size, self.patch_size) –> (4872,1176)–>(4872,3,2,14,14)而后再去通过卷积处理得到 (4872,1280,1,1,1)最后得到:(4872,1280),也就对应着:(grid_t*grid_h*grid_w, hiddend_size);
2、Qwen2_5_VisionRotaryEmbedding;
3、Qwen2_5_VLVisionAttention:首先去划分window_size这一步直接根据计算得到的:[grid_t, grid_h, grid_w]去划分windows,比如说在上述例子中,得到的cu_seqlens = [0,64,128,…,4872],而后再去通过如下处理:
lengths = cu_seqlens[1:] - cu_seqlens[:-1]
splits = [
    torch.split(tensor, lengths.tolist(), dim=2) for tensor in (query_states, key_states, value_states)
]
去划分q、k、v(形状都为:[1, 16, 4872, 80])然后计算注意力,而后通过Qwen2_5_VLPatchMerger将结果合并起来。
具体计算过程,首先是如何得到cu_seqlens,因为我们得到的gird_thw=(1, 84, 58)也就是说总共有84*58=4872个token去计算全局注意力,那么这就会导致计算注意力的消耗过大,因此可以先去切分成小的window然后小块内部注意力计算。因此首先计算“块”的大小:vit_merger_window_size = self.window_size // self.spatial_merge_size // self.patch_size得到结果为: 4(112/2/14)也就是说每块大小为:4x4=16,但是不一定我的grid_h和grid_w可能整除4,因此就需要去计算填充数量 vit_merger_window_size - llm_grid_h % vit_merger_window_size 分别得到 4和2因此填充后的h和w为:88,60这样一来计算得到window数量为:88//4 * 60//4=330每个窗口的tokens数量:16
4、图像处理过程总结
总结上述图像处理过程:对于任意输入图像首先通过smart_resize(首先将图像改变到 factor的倍数,然后去判断和min_pixels和max_pixels之间大小,然后进行扩大,缩小)进行处理保证都可以整除patch_size(14)然后丢到 processor中进行处理主要是对图像归一化、正则化、改变维度(还会通过smart_resize在处理一次),处理之后再去确定他的 grid_t, grid_h, grid_w(对于这3个参数确定:直接通过 第二次smart_resize处理之后的结果除 patch_size即可)也就是tokens数量,而后将图像内容通过 conv3d处理得到:(grid_t* grid_h* grid_w, hidden_size),最后就是计算window_attention(首先确定widow_size索引,通过索引进行切分,最后计算注意力)
补充:对于window-attention可以用卷积的思路去理解,比如说我得到“图像”:
(grid_t, grid_h, grid_w)我提前计算我的“卷积核”大小(vit_merger_window_size = self.window_size // self.spatial_merge_size // self.patch_size)为了保证我的 “图像”可以被卷积核处理就需要做一部分填充,而后用这个“卷积核”去划分成不同“小块”在到这个小块里面计算注意力。
QwenVL的微调过程
所有的代码:https://github.com/shangxiaaabb/Docparse-QwenVL
补充一:节约显存可以进行的操作
1、使用gradient_checkpointing:model.gradient_checkpointing_enable()
2、使用qlora进行优化
3、使用AdamW8bit而不是AdamW
4、使用xformers(model.enable_xformers_memory_efficient_attention()),不过需要注意的是 QwenVL2.5不支持使用xformers(除此之外安装也比较复杂)
5、避免显存碎片(不要过度的去评估模型),可以使用gc.collect() torch.cuda.empty_cache()去适当的减小缓存压力,对于不需要的内容(中间值)直接通过del xx处理掉
SFT 处理
https://www.f22labs.com/blogs/complete-guide-to-fine-tuning-qwen2-5-vl-model/
SFT数据处理过程
首先假设数据(通过jsonl进行存储)输入格式为:
{"image":
    "845c2f9b-0583-4127-82a6-47c4c1c3ceb7.jpg",
"prefix":
    "QwenVL HTML",
"suffix":
    "<body><h2 data-bbox=......"
}
构建data_loader只需要注意如下几个流程即可:
首先构建我的输入模板。这一步主要是将我的数据进行读取,然后去构建成QwenVL2.5(或者其他大模型的对话形式),比如说:
def format_data(self, image, entry, text, prompt):
    return [
        {
            "role": "system",
            "content": [{"type": "text", "text": self.SYSTEM_MESSAGE}],
        },
        {
            "role": "user",
            "content": [
                {
                    "type": "image",
                    "image": image,
                },
                {
                    "type": "text",
                    "text": (
                        "Must output the layout of the image strictly in HTML format. "
                        "Must follow the example below:\n"
                        "<h2 data-bbox='x1 y1 x2 y2'>Text</h2>\n"
                        "<p data-bbox='x1 y1 x2 y2'>Text</p>")
                },
            ],
        },
        {
            "role": "assistant",
            "content": [{"type": "text", "text": text}],
        },
    ]
然后就只需要将参数丢到这个函数里面就可以自动化的将数据处理好(补充一点,对于上面几个参数,一般来说其中text就是我的模型需要输出的label,而后其他的内容就是模型的输入),其次就只需要将输入进行编码即可也就是说直接通过:
image_inputs, _ = process_vision_info(messages)
encoding = self.processor(
    text=[text],
    images= image_inputs,
    return_tensors="pt",
    padding= False,
    truncation=True,
    max_length= self.max_length
)
这样就会的得到模型的输入内容,一般来说得到的是:input_ids: 文本编码内容(一般来说会直接将 input_ids进行复制作为我们的 labels,当然也可以直接对与输入解析,只需要模型那部分作为labels),attention_mask,pixel_values: 图片像素编码结果image_grid_thw: 我的tokens数量(grid_t*grid_h*grid_w)。
不过上面处理过程只是针对一张图片进行处理去构建对话信息,如果需要处理多组图片同时进行输入(比如说3张图片进行排序,让QwenVL输出)那么处理过程只需要修改 content即可(在content里面指定多个图片即可)
"content": [
            {
                "type": "image",
                "image": "./tmp/7.png",
            },
            {
                "type": "image",
                "image": "./tmp/1.png",
            },
            {"type": "text", "text": "..."},
        ],
SFT模型处理
一般来说如果直接使用lora去对模型进行微调,处理也比较简答:
target_modules = ['q_proj', 'v_proj']
lora_config = LoraConfig(
    task_type= config.lora_task_type,
    target_modules= target_modules,
    r= config.lora_rank,
    lora_alpha= config.lora_alpha,
    lora_dropout= config.lora_dropout,
)
model = get_peft_model(model, lora_config)
这样一来模型就会被lora“包裹”,微调过程也就是优化lora的参数,不过如果需要使用qlora(lora量化版本)再模型加载过程中需要使用参数 quantization_config:
bnb_config = BitsAndBytesConfig(
    load_in_4bit=True,
    bnb_4bit_use_double_quant=True,
    bnb_4bit_quant_type="nf4",
    bnb_4bit_compute_dtype=torch.float16
)
...
if model_name == 'Qwen/Qwen2.5-VL-3B-Instruct':
    model = Qwen2_5_VLForConditionalGeneration.from_pretrained(
        model_name,
        torch_dtype= torch.bfloat16,
        cache_dir= config.cache_dir,
        quantization_config= bnb_config if config.lora_type== 'qlora' else None,
    )
对于模型训练以及参数优化过程就比较简单:
for step, batch in enumerate(train_loader):
    outputs = model(**batch)
    loss = outputs.loss
得到的所有的内容可以直接全部丢到model里面,他会自动计算loss值,对于outputs = model(**batch)模型返回得到结果为:loss: Optional[torch.FloatTensor]:模型计算得到的loss(直接计算交叉熵损失得到),如果输入内容中没有labels(就是模型输出那段文本)那么就不会去计算losslogits: Optional[torch.FloatTensor]:模型输出结果past_key_values: Optional[list[torch.FloatTensor]]:Transformer 解码器的 KV 缓存(每一层的注意力 key 和 value)hidden_states: Optional[tuple[torch.FloatTensor]]:每一层的 hidden state (batch_size, seq_len, hidden_size)attentions: Optional[tuple[torch.FloatTensor]]:每一层注意力权重 (batch_size, num_heads, seq_len, seq_len)rope_deltas: Optional[torch.LongTensor]:旋转位置编码 RoPE(Rotary Position Embedding)的偏移量
RL 处理
强化学习框架很多,1、huggingface-trl: https://github.com/huggingface/trl;2、字节跳动-verl: https://github.com/volcengine/verl;3、OpenRLHF:https://github.com/OpenRLHF/OpenRLHF
强化学习处理过程(直接使用 trl(使用版本:0.22.1)库,它里面提供了多种脚本)对于多模态/大语言模型使用RL中比较常见的的数据类型:一般就是抛出问题,而后给出选项让模型进行选择。此类数据集一般格式为:
{"images": [], "prompt": [], "chosen": [], "rejected": []}
# 当然这个 images 也可以替换为文本问题 "question"
比如说数据集:HuggingFaceH4/rlaif-v_formatted他的数据结构如下: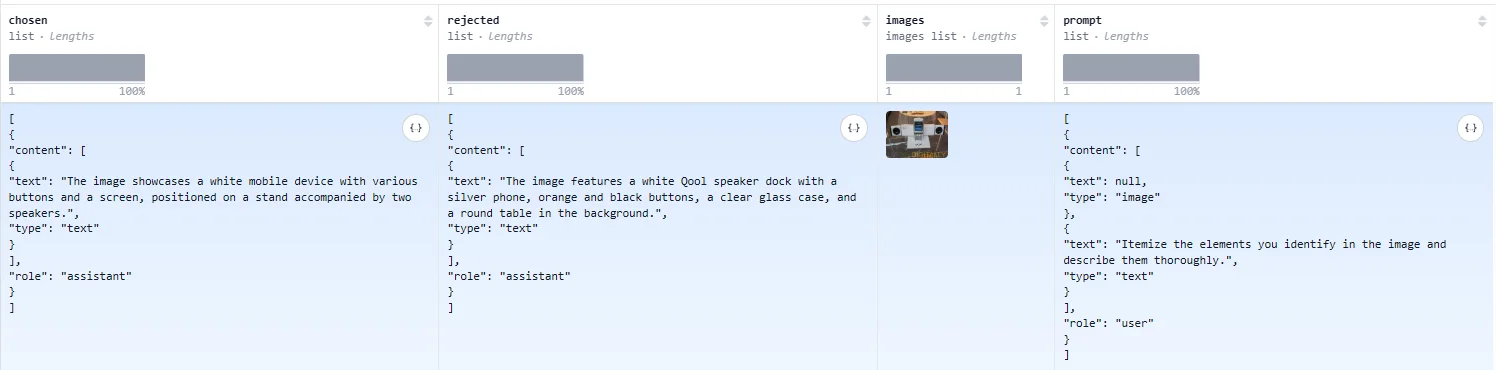
直接看trl中如何实现QwenVL-DPO过程代码:
from trl import (
    DPOConfig,
    DPOTrainer,
    ModelConfig,
    ScriptArguments,
    TrlParser,
    get_kbit_device_map,
    get_peft_config,
    get_quantization_config,
)
...
dataset = load_dataset(
    script_args.dataset_name,
    name=script_args.dataset_config,
    streaming=script_args.dataset_streaming,
)
...
# ref_model 和 model 都是直接使用QwenVL
trainer = DPOTrainer(
    model,
    ref_model,
    args=training_args,
    train_dataset=dataset[script_args.dataset_train_split],
    eval_dataset=dataset[script_args.dataset_test_split] if training_args.eval_strategy != "no" else None,
    processing_class=processor,
    peft_config=peft_config,
)
初次之外,RL就和SFT一样需要让模型去按照我的数据进行输出,因此处理也就是直接logits=model(**model_inputs).logits得到模型最后输出(见相当于每个词的概率)
RL-DPO处理代码
首先在代码(DPOTrainer)主要是通过继承 Trainer(代码包裹好了各种处理过程比如数据加载模型评估等各项处理过程)直接看 DPOTrainer里面的 get_batch_loss_metrics(完整模型输入然后输出loss):
def get_batch_loss_metrics(self, model, batch, train_eval):
    ...
    if ...:
        ...
    else:
        model_output = self.concatenated_forward(model, batch)
        if "ref_chosen_logps" in batch and "ref_rejected_logps" in batch:
            ref_chosen_logps = batch["ref_chosen_logps"]
            ref_rejected_logps = batch["ref_rejected_logps"]
        else:
            ref_chosen_logps, ref_rejected_logps = self.compute_ref_log_probs(batch)

        losses = 0
        chosen_rewards = 0
        rejected_rewards = 0

        for idx, loss_type in enumerate(self.loss_type):
            _losses, _chosen_rewards, _rejected_rewards = self.dpo_loss(
                model_output["chosen_logps"],
                model_output["rejected_logps"],
                ref_chosen_logps,
                ref_rejected_logps,
                loss_type,
                model_output,
            )

            weight = self.loss_weights[idx] if self.loss_weights else 1.0
            losses = losses + _losses * weight
            chosen_rewards = chosen_rewards + _chosen_rewards * weight
            rejected_rewards = rejected_rewards + _rejected_rewards * weight
    return losses.mean(), ...
对于DPOTrainer里面data_loader处理过程为,首先对于 dataset会通过 processing_class(一般来说也就是对于文本直接使用 tokenizer,亦或者直接使用 AutoProcessor.from_pretrained(...))进行处理,也就是说会提前将数据processor处理(和SFT处理方式相同)那么就会得到 self.train_dataset,那么接下来就是直接去通过代码(加载train_loader数据),其中处理方式为:ref_chosen_logp, ref_rejected_logp = self.compute_ref_log_probs(padded_batch) 对于 compute_ref_log_probs里面处理过程为:直接去通过 model/ref_model去处理:self.concatenated_forward(代码)得到模型输出: model_output,而后再去使用 self.dpo_loss去计算损失。
self.concatenated_forward处理过程 Github-代码(实际解释使用 trl:0.22.1版本代码和github有差异)
def concatenated_forward(model, batch, is_ref_model):
    concatenated_batch = self.concatenated_inputs(batch, padding_value=self.padding_value)
    prompt_input_ids = concatenated_batch["prompt_input_ids"]         # 问题文本
    prompt_attention_mask = concatenated_batch["prompt_attention_mask"]
    completion_input_ids = concatenated_batch["completion_input_ids"] # 回答文本 同时拼接了chosen_input_ids 和 rejected_input_ids
    completion_attention_mask = concatenated_batch["completion_attention_mask"]
    if self.is_encoder_decoder:
        labels = completion_input_ids
        labels[completion_attention_mask == 0] = self.label_pad_token_id
        outputs = model(
                    input_ids=prompt_input_ids,
                    attention_mask=prompt_attention_mask,
                    labels=labels,  # we need the labels for the logits to be returned
                    **model_kwargs,
                )
        logits = outputs.logits
        loss_mask = completion_attention_mask.bool()
    else:
        # Process-1
        input_ids = torch.cat((prompt_input_ids, completion_input_ids), dim=1)
        ...
        outputs = model(input_ids, **model_kwargs)
        logits = outputs.logits
    # Process-2
Process-1:首先是将文本和回答进行拼接,而后去判断如果指定 max_length那么就去根据 truncation_mode(掐头/去尾:保留序列末尾,移除开头多余部分)去裁减输入以及移除填充和限制计算范围来优化内存和性能最后丢到模型中进行处理。
掐头去尾过程
keep_start:保留序列开头。先调用 flush_left(所有有效的token左移动去除中间padding)。然后截断到 max_length([:, :self.max_length])。[0, 0, x, x, x, x] → flush_left后[x, x, x, x],若 max_length=3,则截断为[x, x, x]
keep_end:保留序列末尾。先调用 flush_right(将所有有效token向右移动,前面填充padding)。截断到最后 max_length 个 token([:, -self.max_length:])。再次调用 flush_left,确保左侧无填充。[0, 0, x, x, x, x] → flush_right后[0, 0, x, x],截断后[x, x],flush_left 后保持不变。
回顾一下self.concatenated_forward(模型处理)整个过程:首先是将chosen_input_ids 和 rejected_input_ids两部分进行拼接(self.concatenated_inputs做的,于此同时对于其他内容也都会拼接成两部分)作为我们模型的回答。而后丢到模型中进行处理(对于 is_encoder_decoder 可以直接给模型处理,如果不是那么就通过截断裁剪等处理来节约存储在由模型处理)得到 logits,去通过logits, label得到每个token的对数概率:all_logps,而后再去判断是否进行优化策略: ipo 或者 ld_alpha(长度去敏化)去优化得到的 all_logps(对其直接切分就可以得到:chosen_logps 和 rejected_logps)
self.dpo_loss计算损失过程 Github-代码(实际解释使用 trl:0.22.1版本代码和github有差异)
model_output = self.concatenated_forward(model, batch)
if "ref_chosen_logps" in batch and "ref_rejected_logps" in batch:
    # 直接使用数据里面的的结果
    ref_chosen_logps = batch["ref_chosen_logps"]
    ref_rejected_logps = batch["ref_rejected_logps"]
else:
    # 相对于直接在用模型处理一下得到结果
    ref_chosen_logps, ref_rejected_logps = self.compute_ref_log_probs(batch)
_losses, _chosen_rewards, _rejected_rewards = self.dpo_loss(
    model_output["chosen_logps"],
    model_output["rejected_logps"],
    ref_chosen_logps,
    ref_rejected_logps,
    loss_type,
    model_output,)
if "ref_chosen_logps" in batch and "ref_rejected_logps" in batch:直接使用数据里面的结果过程一样的还是通过模型self.compute_ref_log_probs(batch)(这个还是调用了self.concatenated_forward)去得到chosen_logps 和 rejected_logps结果。
对于 dpo_loss 里面model_ 和 ref_ 这两部分理论上是两个不同的模型的输出结果,但是如果没有指定 ref_model 那么直接就都直接使用 model 即可
对于DPO的loss处理过程就比较简单,在trl中提供3种计算方式:
1、Alpha散度计算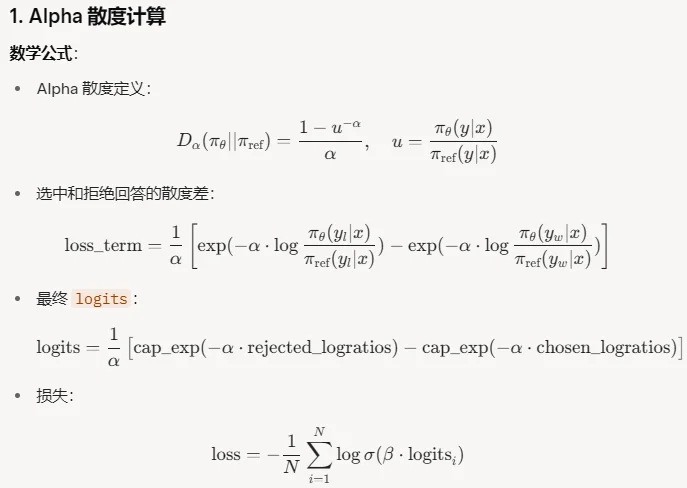
2、KL散度计算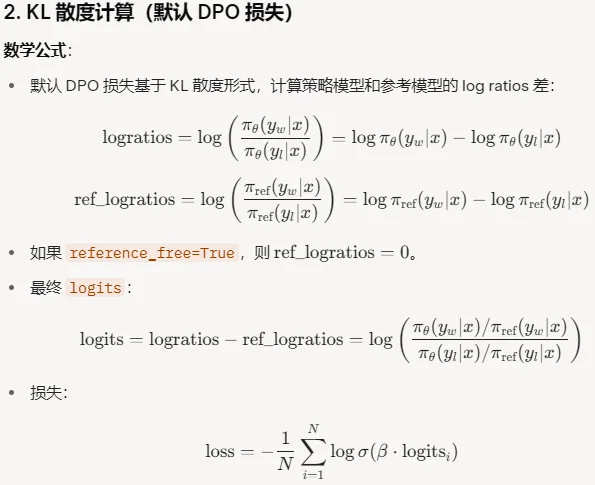
3、JS散度计算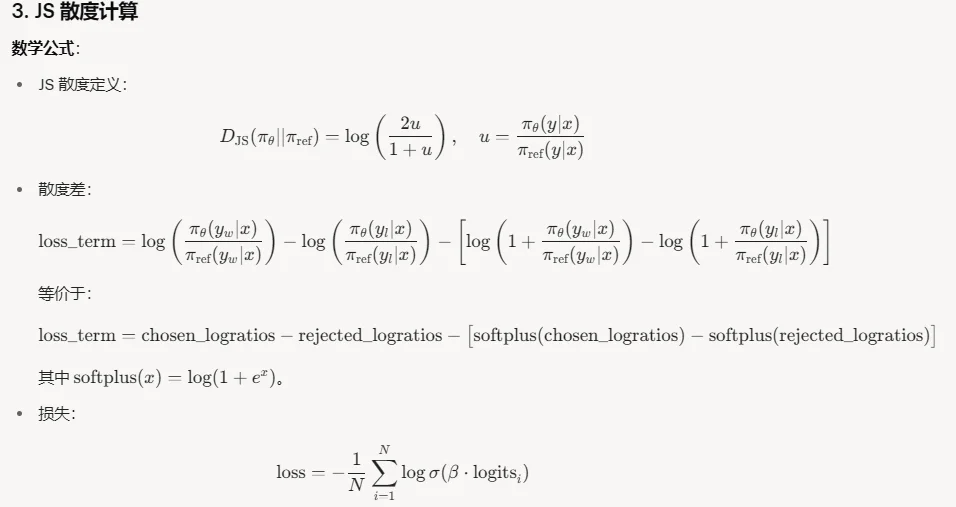
在计算得到不同方式得到的结果:logits然后再去根据不同 loss_type去做处理(比如说:loss_type == "sigmoid" 处理过程为:losses = (-F.logsigmoid(self.beta * logits) * (1 - self.label_smoothing)- F.logsigmoid(-self.beta * logits) * self.label_smoothing))
RL-DPO处理过程总结
首先对于我们的数据集(假设为3元组:[问题, 接受回答, 拒绝回答])首先就是去通过 processor(比如Qwen2.5vl可以直接 load)去编码我的所有内容(这一步和SFT过程相似),而后就是去通过self.concatenated_forward这个函数将我们的3元组进行拼接得到:[问题,问题], [接受回答, 拒绝回答]而后得到模型的输入为:[问题+接受回答, 问题+拒绝回答],将输入直接交给的模型(由于见内容直接拼接起来,可能会优化模型的输入/出长度过长导致爆显存,因此输入之前会由一些裁剪处理操作)去得到输出:logits,而后通过logits, label得到每个token的对数概率:all_logps,(通过对all_logps进行拆分)就可以得到接受回答的值(chosen_logps),以及拒绝回答的值(rejected_logps),最后在得到这两部分值之后就是直接去计算loss。
对于loss计算过程(假设为KL散度):$\mathrm{loss}=-\frac{1}{N}\sum_{i=1}^{N}\log\sigma\left(\beta\cdot((\log\pi_{\theta}(y_{w}|x)-\log\pi_{\theta}(y_{l}|x))-(\log\pi_{\mathrm{ref}}(y_{w}|x)-\log\pi_{\mathrm{ref}}(y_{l}|x)))\right)$。对于里面两项相减过程代码:
chosen_logratios = chosen_logps.to(device) - (not self.reference_free) * ref_chosen_logps.to(device)
rejected_logratios = rejected_logps.to(device) - (not self.reference_free) * ref_rejected_logps.to(device)
反思:如果需要手搓一个DPO训练过程代码(需要借鉴concatenated_forward代码来辅助实现)
RL-GRPO处理代码
官方实现代码,对于DPO过程很容易发现一点在GRPO中直接不要ref_model 只是用一个model不过设计了一个reward_function。
- 数据处理过程
以官方代码为例(训练一个具有思考过程的多模态模型),在数据处理层面使用类似如下数据集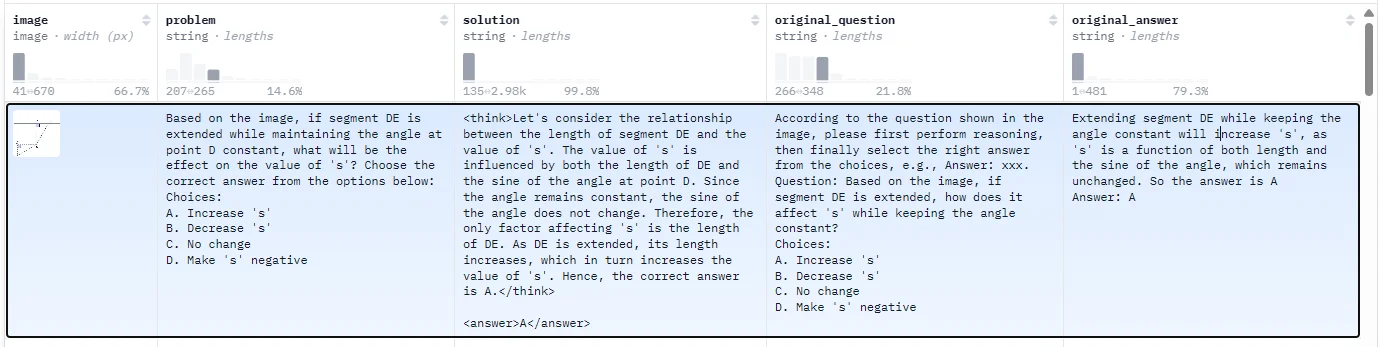
以为需要设计一个“输出”思考过程的模型因此设计设计具有“思考”过程的prompt,最后输入模型数据格式为:
# 原始文本
{'image': <PIL.PngImagePlugin.PngImageFile image mode=RGB size=147x86 at 0x7FF65C5776D0>,
 'original_answer': ...,
 'original_question': ...,
 'problem': ...
 'prompt': [{'content': 'system-content',
             'role': 'system'},
            {'content': 'user-content',
             'role': 'user'}],
 'solution': "<think>...</think>'
             '<answer>...</answer>'}
# 初步处理后文本
{'The prompt Text: '
'<|im_start|>system\n systen-content <|im_end|>\n'
'<|im_start|>user\n user-content <|im_end|>\n'
'<|im_start|>assistant\n'}
# 模型最后得到的输出
output = {
            "prompt_ids": prompt_ids,
            "prompt_mask": prompt_mask,
            "completion_ids": completion_ids,
            "completion_mask": completion_mask,
            "advantages": advantages,
            "num_items_in_batch": num_items_in_batch,
        }
不过在得到类似上面数据集之后,不是直接丢到模型里面进行处理,在DPOTrainer中首先会去由_prepare_inputs(代码)函数进行处理,对于测试直接通过函数 ` self._generate_and_score_completions(…)`处理,对于训练数据集
_generate_and_score_completions:
第一步、格式化数据。(对于多模态/只有文本)这个过程主要是争对我上面数据中的prompt直接通过模板进行处理得到prompts_text,而后就是直接再去通过processing_claa(直接调用QwenVL的processor)处理得到prompt_inputs,而后就是如果self.max_prompt_length那么就会去对多模态(文字 + 图像)输入时,对prompt_inputs["input_ids"]还原文本然后去除类似<pad>和一些重复/错误的<image>得到干净的prompts_text。
第二步、生成回答。在trl中使用了3种生成方式:1、直接用模型生成;2、使用vllm方式生成;3、使用use_transformers_paged方式。对于生成(直接通过模型)过程而言就比较简单直接将prompt_inputs["input_ids"]和prompt_inputs["attention_mask"]丢到模型里面得到prompt_completion_ids再去将 prompt内容和回答截取出来得到prompt_ids和completion_ids
第三步、计算奖励值。这个过程就比较简单,直接将模型的回答进行解码再去通过奖励函数计算回答的奖励值,而后归一化成优势函数(advantages),按 group(一次生成多个样本)算均值,计算每个样本的 相对优势(比如说两个回答打分为 [0.8, 0.5]那么减去 group 内均值,假设为[+0.15, -0.15])
最后、返回输出。
在最后返回的输出中old_per_token_logps和ref_per_token_logps处理直接通过函数_get_per_token_logps_and_entropies(就相当于把 第二步得到的prompt_completion_ids在交给模型里面去计算每个token的概率)
- 奖励函数设计
GRPO没有使用ref_model转而使用奖励函数,对于奖励函数设计:think_format_reward, accuracy_reward。对于accuracy_reward很容易理解代码就是直接对比模型输出和答案之间是否正确(通过parse [from math_verify import LatexExtractionConfig, parse, verify] 去解析最后输出打答案然后对比两者之间是否正确)。对于think_format_reward:这个更加直接,直接去判断输出是不是有 <think>...</think> 包裹(有=1,无/缺失=0)
当然不一定要使用自定义的(这么粗糙的)在DPOTrainer中对于self.reward_funcs(代码)也可以直接去加载训练好的模型 AutoModelForSequenceClassification.from_pretrained(...)
- 模型处理过程
直接去看loss计算过程:
def compute_loss(self, model, inputs, return_outputs, num_items_in_batch):
    ...
    if self.use_liger_loss:
        unwrapped_model = self.accelerator.unwrap_model(model)
        return self._forward_redirection(model, unwrapped_model, self.compute_liger_loss, unwrapped_model, inputs)
    else:
        return self._compute_loss(model, inputs)
其中使用了两种loss处理过程:_forward_redirection 以及 _compute_loss。
self._compute_loss处理过程(Github-代码)(实际解释使用 trl:0.22.1版本代码和github有差异)
首先是将输入问题和回答拼接起来,然后直接丢到self._get_per_token_logps_and_entropies(直接将数据丢到模型中,而后去截取模型输出中“真正回答”的内容)中进行处理得到per_token_logps(每个token的概率),entropies(每个token的信息熵),而后就是通过高熵去过滤token只在高熵位置计算 loss,而后就是计算KL散度(torch.exp(inputs["ref_per_token_logps"] - per_token_logps) - (inputs["ref_per_token_logps"] - per_token_logps) - 1)),避免新策略漂移太远
self._get_per_token_logps_and_entropies处理过程(Github-代码)(实际解释使用 trl:0.22.1版本代码和github有差异)
其处理过程比较简单,直接将所有的数据都处理成模型输入(GRPO不想DPO那样需要将3元组进行拆开拼接)如:input_ids、pixel_values等然后直接logits = model(**model_inputs).logits在得到模型的输出之后后续就是对输出做一些截断处理(如只需要模型回答部分的输出logits[:, -logits_to_keep:, :])而后去计算logits / self.temperature(通过温度系数来确定输出内容多样化)最后再去通过:logps = selective_log_softmax(logits, completion_ids)(selective_log_softmax只去计算completion_ids部分的log_softmax值)就可以得到最后的值。
RL-GRPO处理过程总结
对于上面loss计算公式中主要就是如下几个值需要关注:1、advantage值;2、KL散度值。
因此简单总结一些GRPO代码处理过程1,首先,对于数据处理,这块内容比较简单直接 模板化、编码内容即可,因为GRPO是“一个问题抛出多组回答然后评估回答”,因此在数据处理过程中通过模型生成回答 prompt_completion_ids=model.generate(...)而后需要做的就是将生成内容进行拆分得到prompt_ids和 completion_ids(得到这一部分值之后就只需要在去还原成text文本然后再去通过reward函数去计算reward值以及计算最后需要的 advantage值),除此之外还会去通过model和model_ref分别计算回答中每个token的logits值:old_per_token_logps 和 ref_per_token_logps
这个过程直接通过函数 _get_per_token_logps_and_entropies处理,他的处理思路简单直接将 model需要的内容再丢到model里面得到每个token的logits然后再去计算softmax值
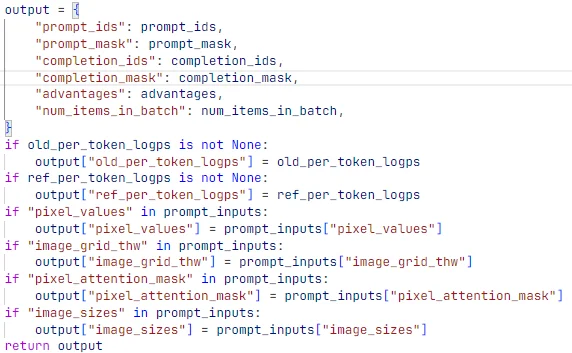
最后得到一个完整的output如下:
output = {
    "prompt_ids": prompt_ids,    # 问题token
    "prompt_mask": prompt_mask,
    "completion_ids": completion_ids,    # 问题的回答token
    "completion_mask": completion_mask,
    "advantages": advantages,
    "num_items_in_batch": num_items_in_batch,
    "old_per_token_logps": old_per_token_logps
    "importance_sampling_ratio": importance_sampling_ratio
    "ref_per_token_logps": ref_per_token_logps
    "pixel_values": prompt_inputs["pixel_values"]
    "image_grid_thw": prompt_inputs["image_grid_thw"]
    "pixel_attention_mask": prompt_inputs["pixel_attention_mask"]
    "image_sizes": prompt_inputs["image_sizes"]
}
而后,对于loss计算过程首先将上面output中的 问题+回答进行组合再丢到_get_per_token_logps_and_entropies中得到每个token概率以及熵的值:per_token_logps,entropies,而后就是:1、选择出高熵值的token(entropy_mask);2、计算KL散度(torch.exp(ref_per_token_logps - per_token_logps) - (ref_per_token_logps - per_token_logps) - 1);3、重要性采样权重:比较当前 log 概率和旧策略(per_token_logps - old_per_token_logps),得到 importance weight,做 clipping 限制。构造两个候选 loss(不裁剪和裁剪),取最小值,形成 per_token_loss再去乘上 entropy_mask和加上 KL 惩罚项就可以得到最后的loss值。
RL-PPO处理代码
借用huggingface中对于PPO过程描述图:
对于代码使用,相比较GRPO和DPO要简单很多(不过在使用模型上,DPO和PPO都需要加载model和ref_model而GRPO只需要加载一个model),按照上面的处理过程:
首先计算rollout输出,直接通过加载的模型然后模型对于“问题”去得到“回答”query_responses(完整的模型生成内容:prompt+模型的回答),logitss,接下来(代码)去计算model和ref_model中每个token的log概率值(这个过程和GRPO处理是一样的,将问题+回答拼接起来而后丢到模型中计算每个token的log概率值)最后分别得到模型的输出结果:logprobresponse(截取model回答内容) 和 ref_logprob。后面部分(代码)就是直接根据 response(model的回答) 以及 query(就是我们的问题)去计算reward的值scores。
接下来处理过程:1、处理 EOS 缺失惩罚:将socres中如果生成内容不含结束标记就从scores中减去数值;2、计算kl以及最后的rewards值,对kl直接首先通过mask去掩盖部分logprobs(ref_logprobs)然后直接通过 kl = -(ref_logprobs - logprobs) if args.kl_estimator == "k1" else ((ref_logprobs - logprobs).exp() - 1) - logr得到kl值;3、计算advantage值(代码)
最后就是迭代优化模型参数(代码)这个过程(对采样得到的一批序列数据做多轮(num_ppo_epochs)小批次更新,通过 ratio = πθ/π_old 和裁剪(clip)来构造策略损失,同时对价值函数做裁剪的 value loss)主要是进行如下处理流程:首先是直接将最上面得到的query_responses中选择部分例子丢到模型中去计算每一个token的logits( new_logprobs = selective_log_softmax(logits, mb_responses) ) 而后计算策略损失值(pg_loss)以及vf_loss
回顾一下,对于加载的llm在使用generate时一般返回如下4个值:
sequences:生成的 token ids(跟默认返回一样);scores:每一步的 logits(如果 output_scores=True)attentions:注意力矩阵(如果 output_attentions=True)hidden_states:隐藏层表示(如果 output_hidden_states=True)
一般而言使用到的主要是上面两项,对于第一项sequences一般得到的完整的回答(prompt+模型生成的内容),所以一般会有一个截取处理(只需要记录inputs['input_ids'].shape[1]然后去截取即可);对于第二项scores一般得到的是通常是logits(需要去通过softmax计算才能得到token概率);因此在GRPO和PPO中为了得到每一个token的log概率值,logprob = selective_log_softmax(logits, response)直接通过这种方式去计算来节约显存。
除此之外也有直接通过model(**model_inputs)这样处理一般得到的是
RL-PPO处理过程总结
第一阶段:首先是对于问题(query)通过丢到模型batch_generation中处理得到query_responses(完整问题+模型回答) 和logitss(每个token对应的概率),进一步将其得到回答token的概率值logprob(selective_log_softmax)同样的处理过程通过policy_model将query_response(从 query_responses挑选的)输入到模型进行处理同样的处理得到ref_logprob,最后就是通过reward_model去计算(torch.cat((query, postprocessed_response), 1))得到奖励值。
第二阶段:kl值:直接计算ref_logprobs - logprobs(也就是计算上面阶段的ref_logprob和 logprob之间差值);rewards值:直接copy计算的kl结果然后再序列的结尾补充上scores;advantage值:根据 reward 和 value,用 GAE 算 advantage。GAE计算过程:$\delta_t = r_t + \gamma V(s_{t+1}) - V(s_t)$ 和$A_t = \delta_t + \gamma \lambda A_{t+1}$最后计算advantages + values也就是 $R_t=A_t+V(s_t)$
第三阶段:进行迭代优化模型参数过程,优化过程首先是直接将小批次的query_responses 输入到模型中计算得到output, vpred_temp然后就是老操纵得到每个token的logits值new_logprobs,然后计算去计算vf_loss:计算loss1(torch.square(vpred - mb_return))和loss2(torch.square(vpredclipped - mb_return))的最大值。pg_loss:计算loss1(-mb_advantage * ratio)和loss2(-mb_advantage * torch.clamp(ratio, 1.0 - args.cliprange, 1.0 + args.cliprange))的最大值然后取mean。最后得到loss为pg_loss + args.vf_coef * vf_loss
vpred、vpredclipped、mb_return分别通过从vpred_temp选择回答token、对vpred进行clamp裁剪、advantages + values
RL算法对比
对比一下GRPO和DPO的处理过程
DPO纯数据驱动过程,数据驱动:训练时需要标注好的偏好对:$[q, y^+], [q, y^-]$。计算流程:1. 输入同一个问题 $q$,分别拼接上正样本回答 $y^+$ 和负样本回答 $y^-$。2. 用当前模型和参考模型分别计算 $\log \pi_\theta(y^+|q), \log \pi_\theta(y^-|q), \log \pi_{\text{ref}}(y^+|q), \log \pi_{\text{ref}}(y^-|q)$。3. 基于这 4 个 log-prob,直接计算一个 logistic 回归式的 loss,强制模型在正样本上比分数更高,在负样本上比分数更低。
GRPO生成驱动过程,生成驱动:训练时只给定问题 prompt,模型自己 roll-out 多个回答。计算流程:1. 对每个问题生成 $G$ 个回答。2. 通过奖励函数(或打分器)给每个回答打分 $r_i$。3. 组内归一化奖励 → 得到 advantage 值 $A_i$(比组内平均好/差多少)。4. 用参考模型计算 ref_per_token_logps(使用ref_model生成没有的话直接用model代替ref_model)。5. 用旧策略(冻结一帧的当前模型)得到 old_per_token_logps(直接通过model生成)。6. 用当前模型得到 per_token_logps。7. 计算重要性比率和 KL 散度(使用per_token_logps和ref_per_token_logps计算)近似,再套 PPO 风格的剪切目标(使用old_per_token_logps和per_token_logp) → 最终 loss。
对于DPO、GRPO、PPO中KL计算差异
$KL(p||q)=\sum_x p(x)\log\frac{p(x)}{q(x)}=H(p,q)-H(q)$,交叉熵-熵
计算交叉熵的目的在于约束新策略不要偏离参考策略太多,类似的对于交叉熵损失($H(p,q)=-\sum_x p(x)\log q(x)$)两者之间差异是交叉熵是让“q去拟合p”,而KL则是度量“q和p之间距离”
1、DPO中计算KL:在model_ref以及model分别输入“3元组”数据之后会去计算不同token的概率值,也就是model和ref都会生成 reject和choose的概率值,然后去计算:$\mathrm{loss}=-\frac{1}{N}\sum_{i=1}^{N}\log\sigma\left(\beta\cdot((\log\pi_{\theta}(y_{w}|x)-\log\pi_{\theta}(y_{l}|x))-(\log\pi_{\mathrm{ref}}(y_{w}|x)-\log\pi_{\mathrm{ref}}(y_{l}|x)))\right)$ 的sigmoid 损失优化相对偏好
2、GRPO中计算KL:通过model_ref对于问题Q以及模型生成的多组回答进而可以得到每组回答的token概率:ref_per_token_logps 而后我又通过model去生成多组回答以及token概率:per_token_logps接下来就是直接他们之间KL散度:
3、PPO中计算KL:通过model得到回答中的每一个token的概率logprobs,同样的再去通过model_rf也去计算每一个token的概率ref_logprobs然后去计算KL
DPO:通过“偏好差值”间接引入 KL 约束,偏重于 对比学习。
GRPO:显式计算 生成候选组的 token 级 KL,作为正则项,保证模型不偏离参考策略。
PPO:基于当前策略与参考策略(或旧策略)的 KL,常作为 正则或 early stopping 信号
对于GRPO以及PPO中优势值计算过程
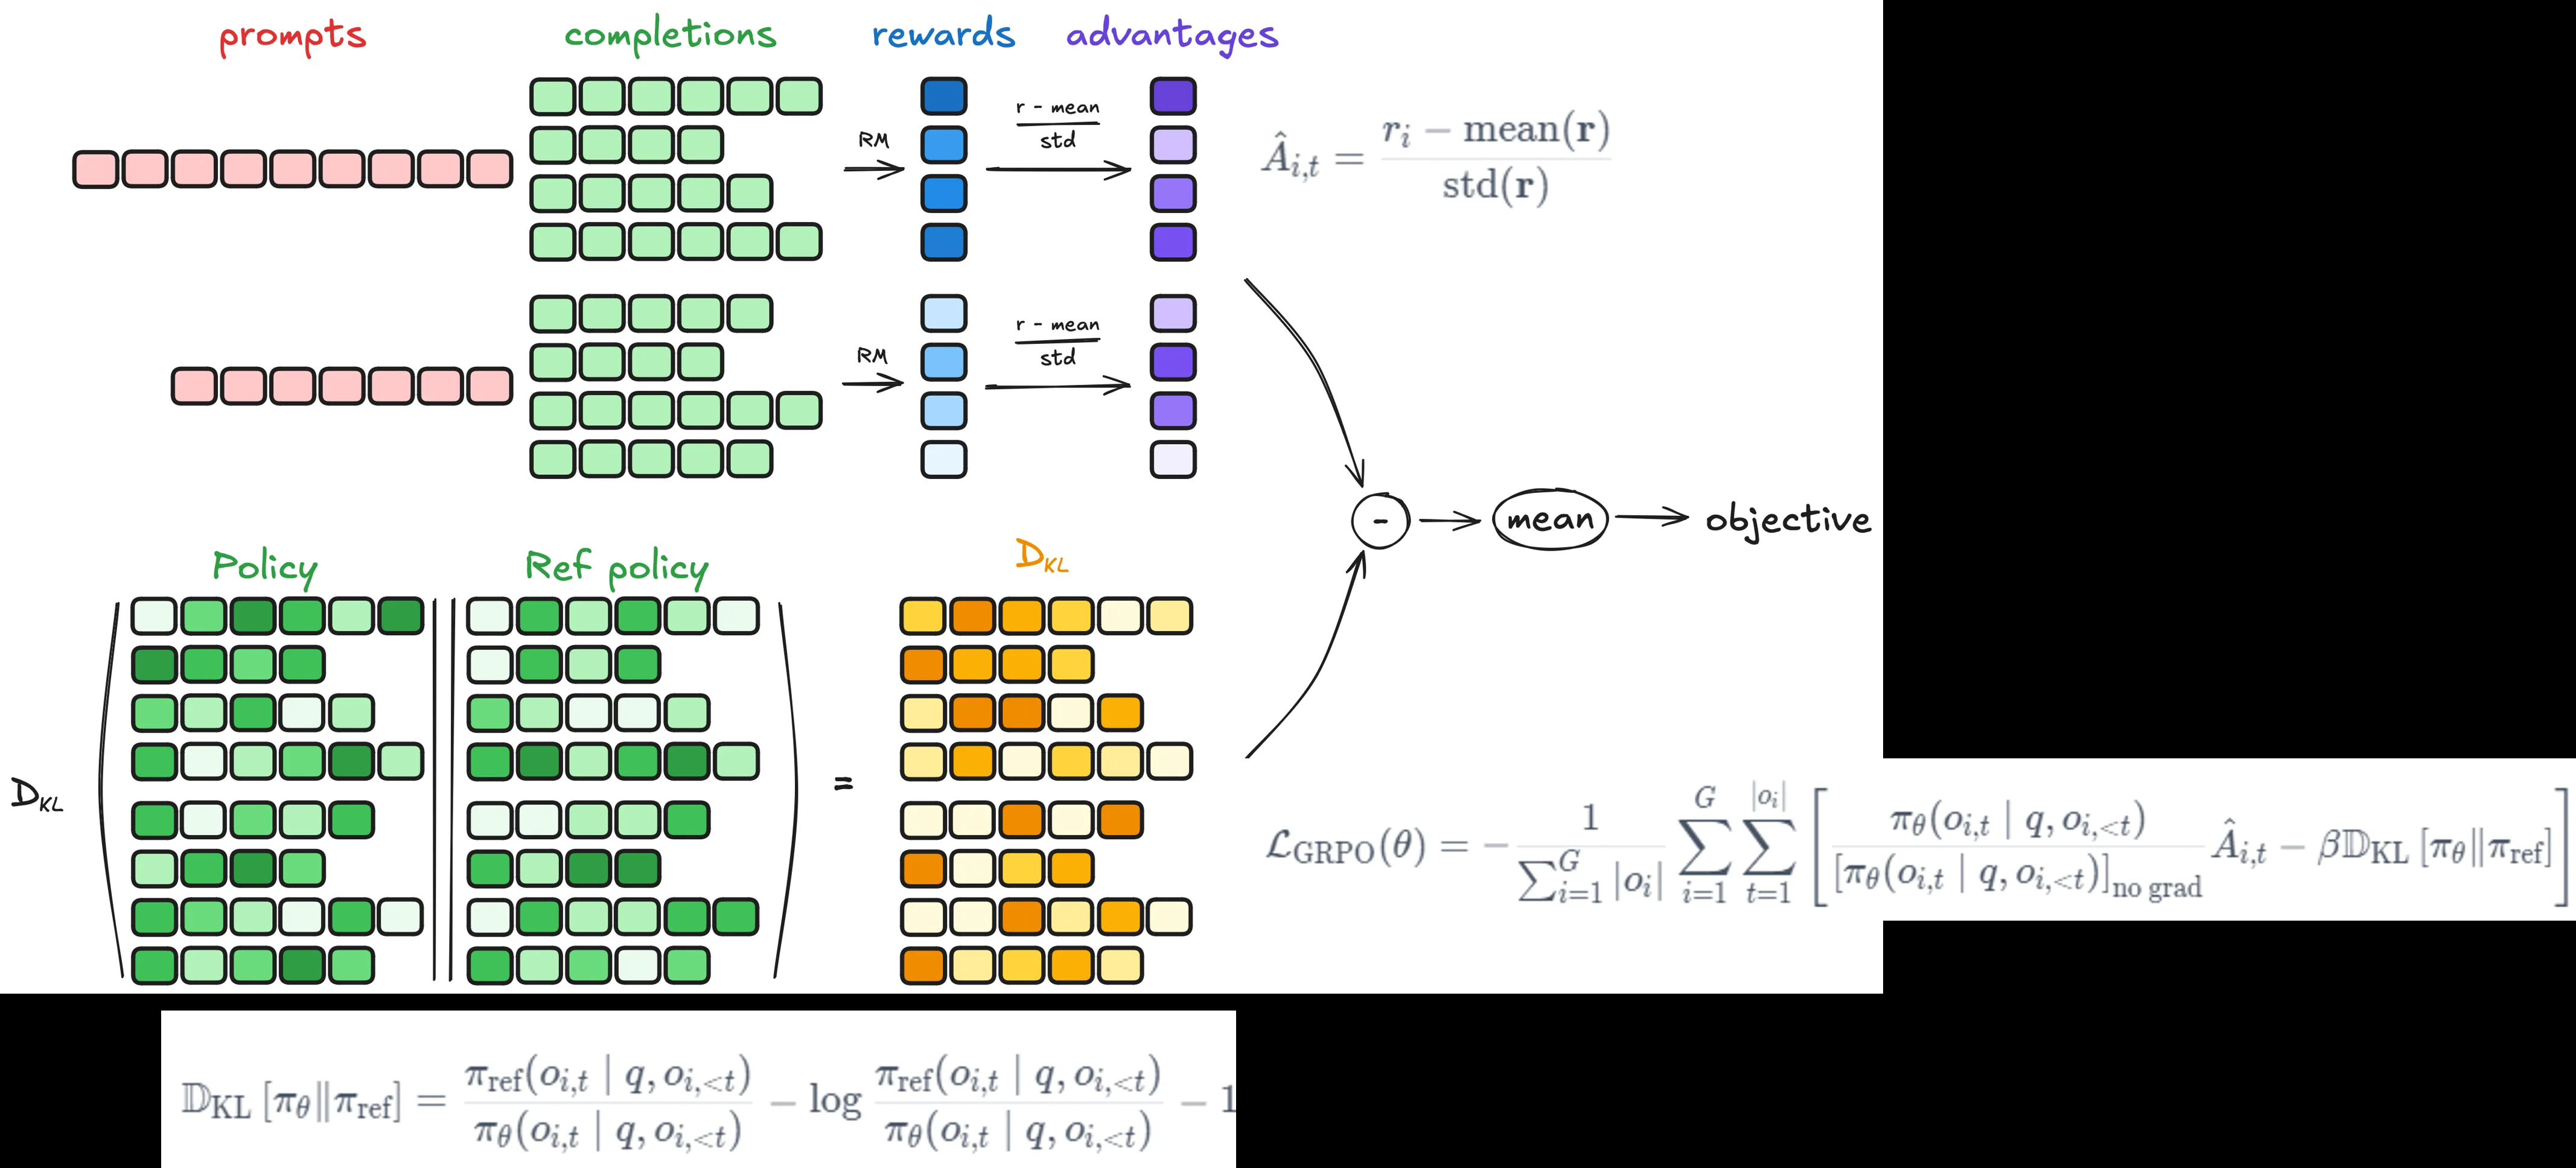
GRPO优势值计算过程:对于给出多组回答直接通过奖励函数去计算每组回答的奖励值而后去上计算:$A_i = \frac{r_i- mean(r)}{std(r)}$
PPO优势值计算过程:一般直接通过广义优势估计方法GAE来计算优势值,首先通过奖励函数评估模型输出(问题+回答),而后计算GAE
对比DPO、GRPO、PPO中loss计算差异
DPO的loss计算:
\(\mathcal{L}_{\text{DPO}} = -\frac{1}{N} \sum_{i=1}^{N} \log \sigma\left( \beta \underbrace{\left[ \log \pi_\theta(y_w|x) - \log \pi_\theta(y_l|x) \right]}_{\text{model 之间差异}} - \underbrace{\left( \log \pi_{\text{ref}}(y_w|x) - \log \pi_{\text{ref}}(y_l|x) \right)}_{\text{隐含 KL 基准}} \right)\)
GRPO的loss计算:
\(\mathcal{L}_{\text{GRPO}} = -\mathbb{E}\left[ \frac{\pi_\theta(y|x)}{\pi_{\text{ref}}(y|x)} A(y) \right] + \lambda \, \mathrm{KL}\left( \pi_\theta \parallel \pi_{\text{ref}} \right)\)
PPO的loss计算:
\(r_t(\theta) = \exp\left( \log \pi_\theta(a_t|s_t) - \log \pi_{\text{ref}}(a_t|s_t) \right)\)
参考
https://huggingface.co/docs/trl/main/en/grpo_trainer ↩